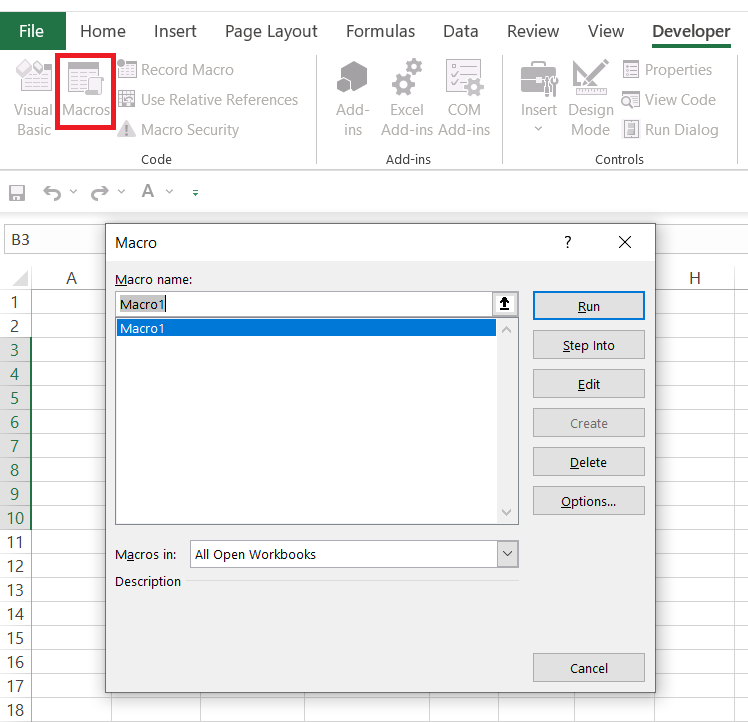
Developer Tab
Allows users to create VBA applications, design forms, create macros, import and export XML data, etc


What Is The Developer Tab?
The Developer tab in Microsoft Office programs like Excel, Word, and PowerPoint provides tools and features meant primarily for developers and power users. It's not visible by default but can be enabled through the options menu.
In Excel, the Developer tab is an inbuilt menu that provides access to advanced features and functions for users.
Have you ever worked on creating a macro (such as one which automatically copies and pastes all the data into a different worksheet) when you hit a roadblock; you are not able to find the tab required to build the macro?
We definitely have. So, worry not! We have got you covered as this article will demonstrate how to enable it if the tab is disabled by default in your Excel version, as well as other key features and functions in the Developer tab.
- The Developer tab in Excel provides access to advanced features and functions, including creating macros and using Visual Basic for Applications (VBA) to automate tasks.
- Enabling the Developer tab can be done by going to "File" > "Options" > "Customize Ribbon" and checking the "Developer" option.
- The Code section in the Developer tab allows users to write and edit VBA code for macros.
- Macros can be recorded or manually written to automate repetitive tasks in Excel.
- The Controls section provides various interactive tools like checkboxes, command buttons, combo boxes, and more, allowing users to create user forms and interactive elements in spreadsheets.
Importance of Developer Tab in Excel
Excel is among the most invaluable tools used by finance professionals. It allows them to conduct a financial analysis of companies based on different parameters or build intricate financial models to help investors improve their investment portfolios and guide their decisions regarding financial markets.
Imagine you are a manager of a financial modeling department, and tomorrow is the earnings release date for multiple companies. Would you be able to cope up with all the work on Excel?
Absolutely not! Working 10-12 hours continuously under intense pressure is no joke. This will only result in stress causing you to pull an all-nighter. That's why it is important to use Excel efficiently and maximize its effectiveness using the various simple but powerful tools that it provides.
But wait, where does the Developer tab even fit into all this? You thought we forgot all about it while fantasizing about Excel. Well, we were actually leading to its intense build-up. *Clumsy drum roll!* IT AUTOMATES YOUR REPETITIVE WORK!
If you activate the tab and use the tools it provides, your efficiency goes through the roof.
An example of using such tools is developing a macro-automated flow of information by imitating your keyboard strokes and mouse clicks. It also helps you to create more advanced functions such as UI-enabled forms, build applications and use XML commands.

How to Add the Developer Tab to the Excel Ribbon?
If you are working on your first macro, there is a high possibility that the tab is not enabled yet. This tutorial will demonstrate how to enable the Developer tab in your Excel 2019/Excel 365 (for Windows):
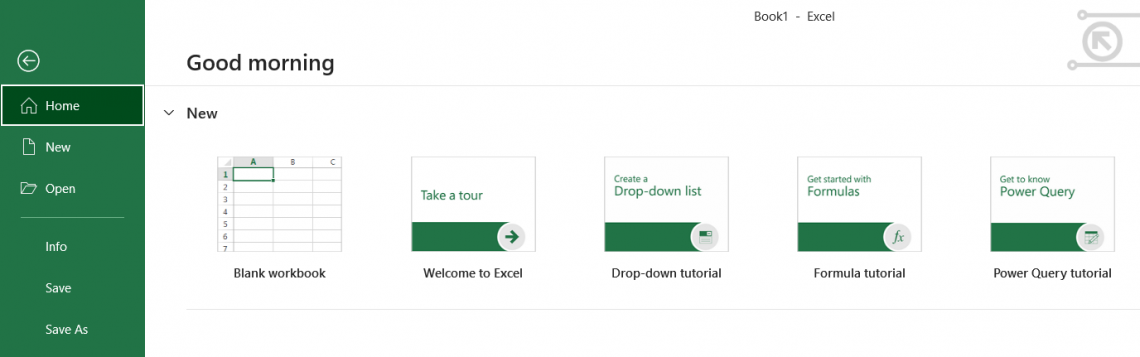
- Open the Start menu and click on the Excel icon, followed by double-clicking on the Blank Workbook option to create a blank workbook.
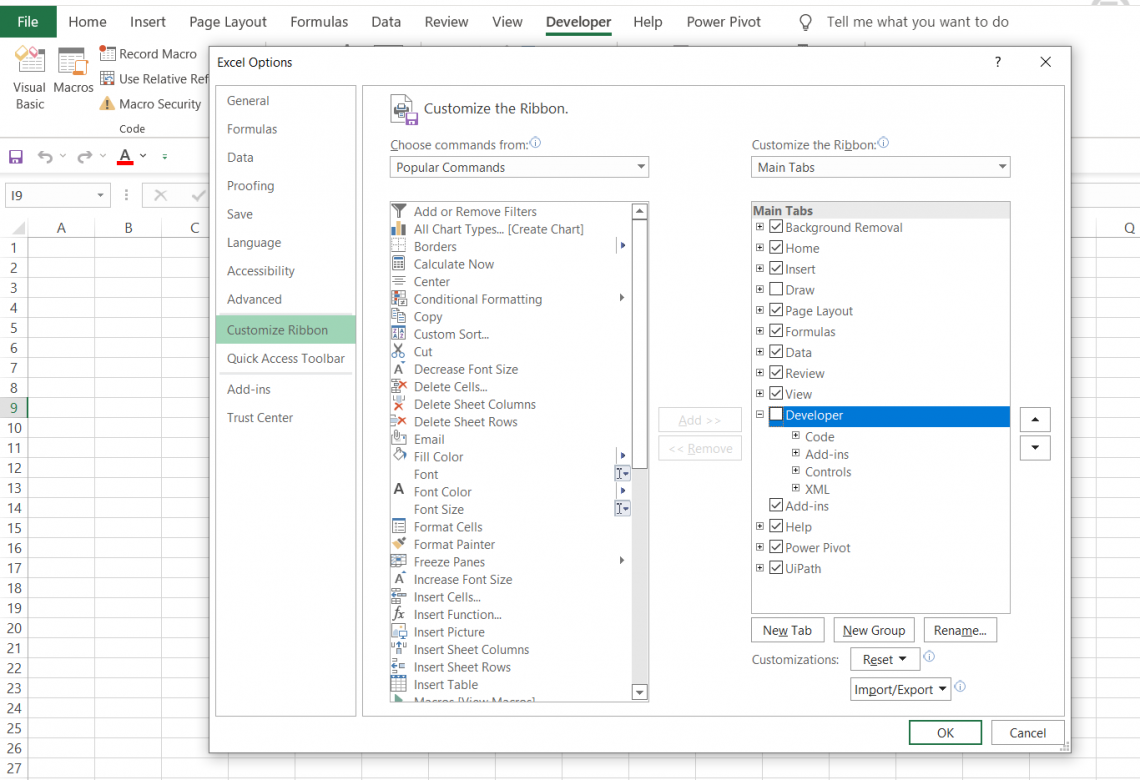
- Click on File and then on Options to navigate yourself to the Customize Ribbon tab. On the right side, you will find the Developer option. Tick the box and click OK to close the dialog box.
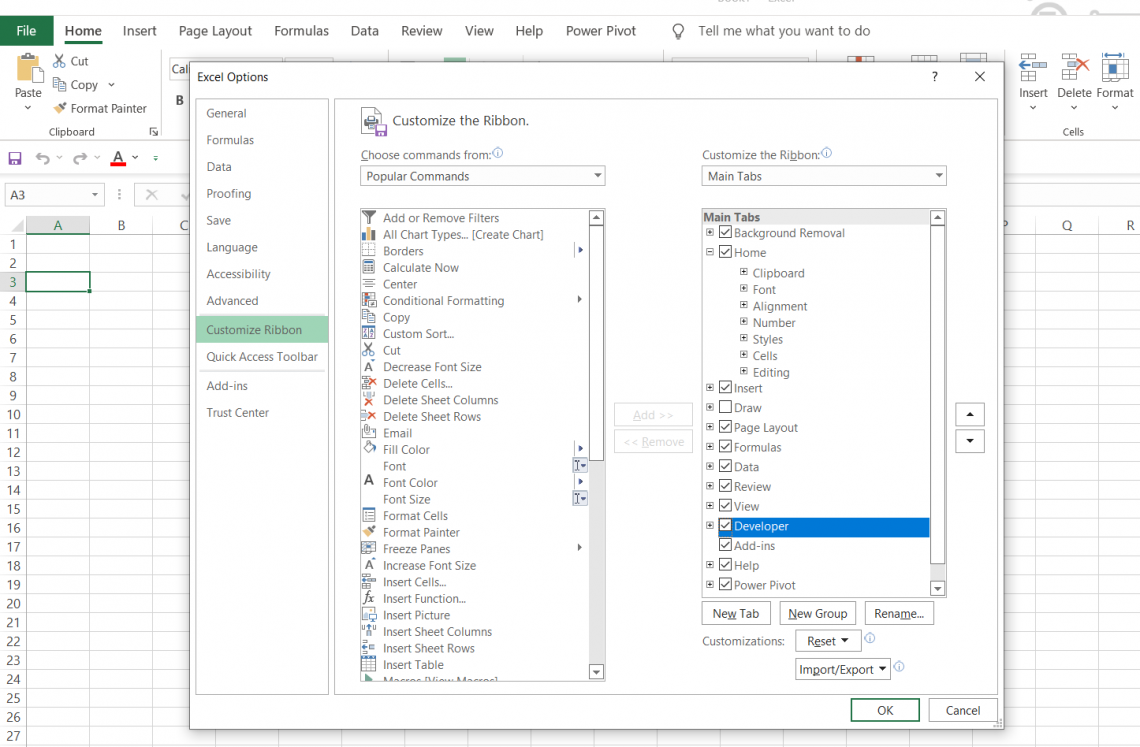
- After clicking on OK, you will land back on the spreadsheet. Notice the difference in the Menu Bar? The Developer tab is now visible in the ribbon in your Excel version. This will now become a default setting, meaning that whenever you open Excel, you will find the Developer tab in the tab list. It looks as below:

Now there might be instances where you have to enable or disable the tab. Here's a quick shortcut for that:
- Right-click on the Menu Bar and click on the Customize the Ribbon option.
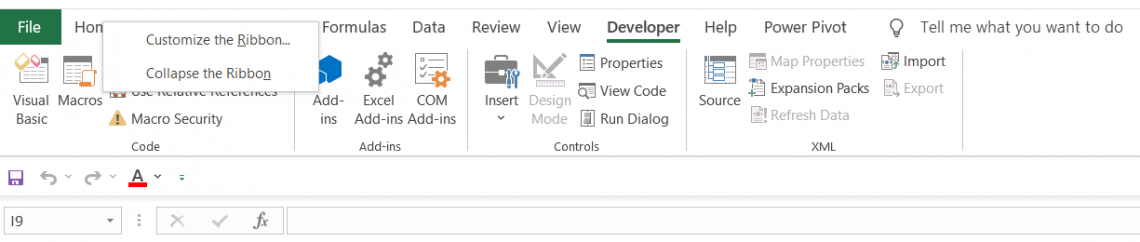
- Ta-da! You can see the Developer option on the right side, just untick the option and click on OK. The Developer tab will go away from the menu list.
Now that you have successfully added the tab in Excel, let's go through its components and understand them.
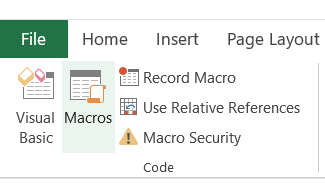
Code Section in developer tab
The code section allows you to use Visual Basics for Application (VBA), an event-driven programming language that allows you to automate different tasks in Excel by creating macros and other functions.
Clicking on the Visual Basics from the Developer tab will open a window that will allow you to write your own code to automate a task in Excel. You can also use the keyboard shortcut of Alt + F11 to open the VBA editor.
But first, you need to add a module to write the code. A VBA module acts as a vessel for your code, keeping it intact.

To add a module, simply follow the instructions below:
- Click on Insert and select the Module option in the VBA editor window.
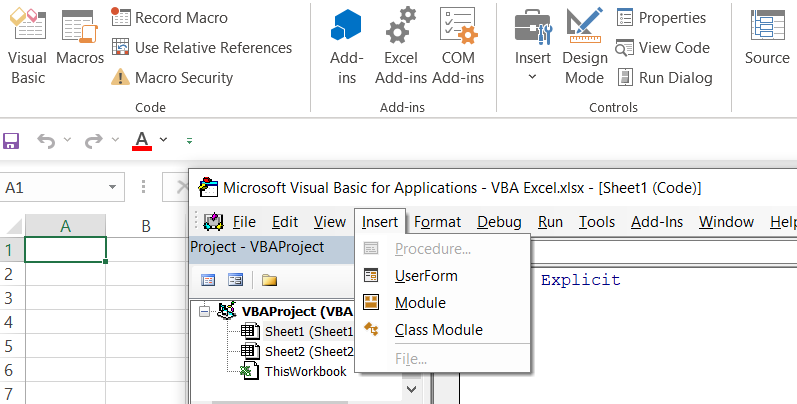
- This will open a new Module which can be renamed by clicking on the Name field in the module properties. Most VBA programmers prefer to add a prefix, say 'A_' before the descriptive name, making it easier to understand what different modules intend to do. Example: A_CopyPaste.
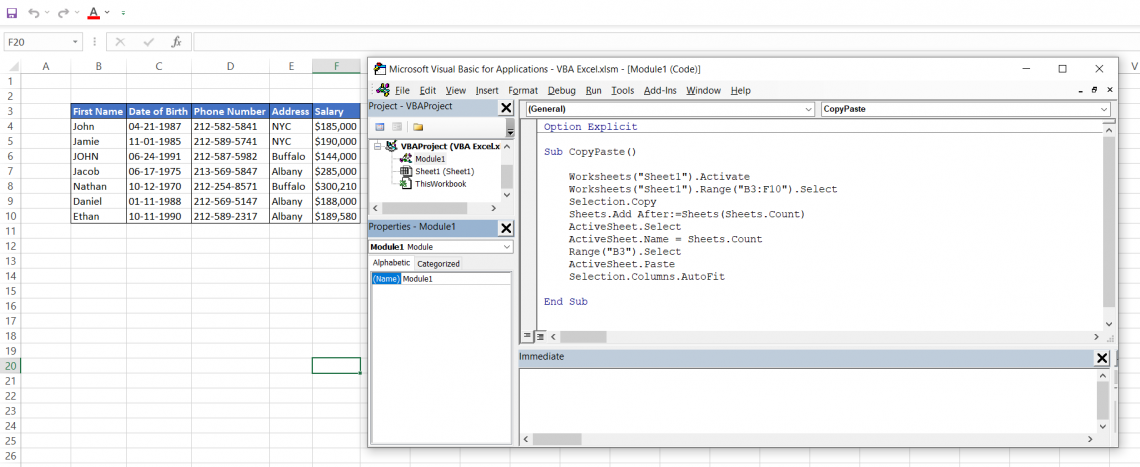
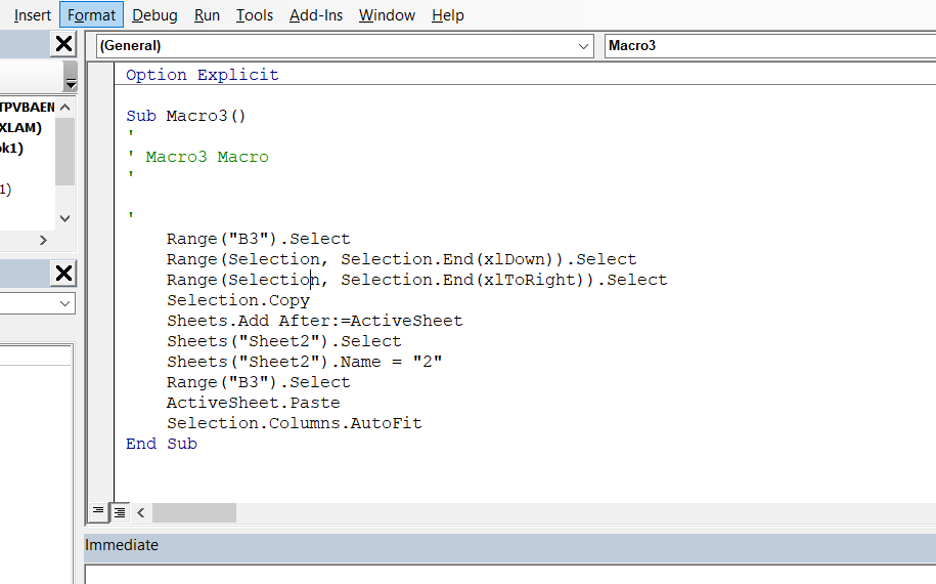
- The code below copies the data in the selected range, create a new spreadsheet, renames it, and pastes the data in the desired cell. Just press F5, and it will run your code or click on Run > Run Sub/UserForm.
If you are not so proficient in coding, you can still record the task. Just click on the Record Macro in the tab, and it will pop up a dialog box where you can give the name as well as a description of the macro.
The assignment of the shortcut key allows you to run the macro directly, just like you do to copy data in a cell using Ctrl + C.
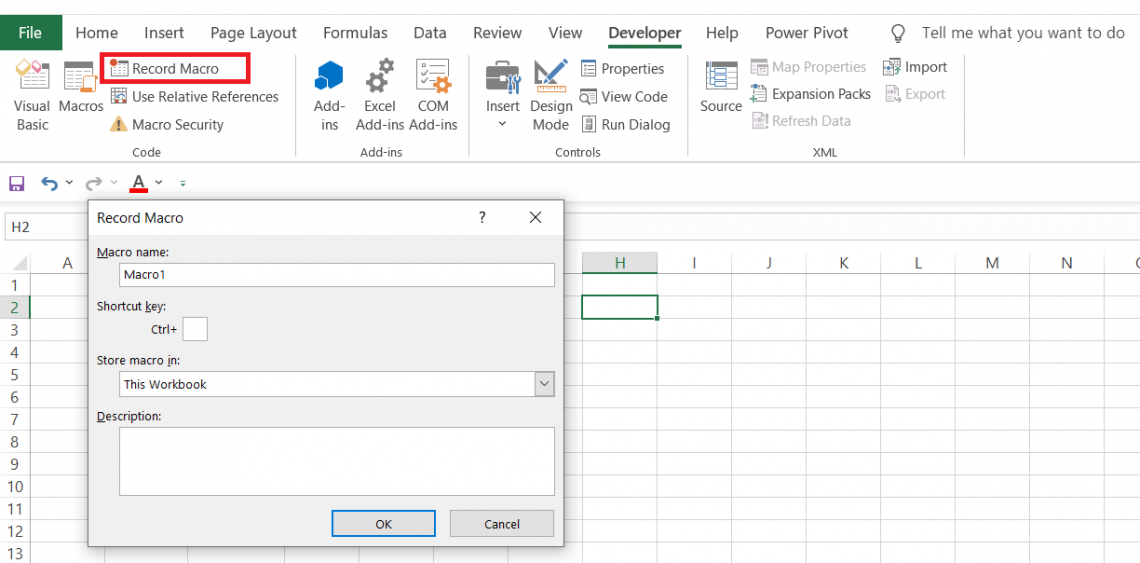
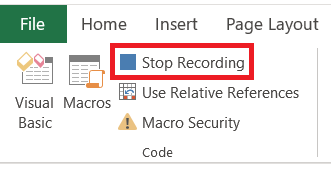
Once you click on OK, it will indicate 'Stop Recording' in the developer tab. This means you are ready to record your first macro. Follow the instructions below to make your own macro that copy-pastes the data into a different spreadsheet:
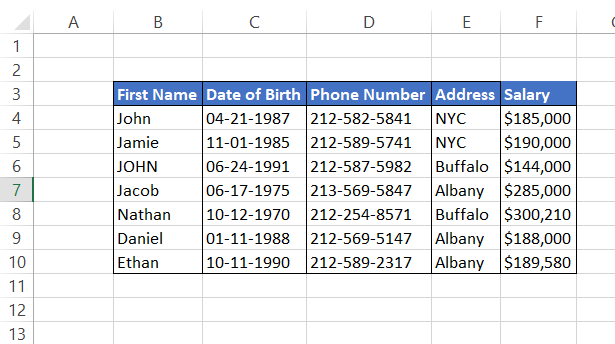
- Select and copy the data in cells from range B3:F10 using Ctrl + C
- Add a new spreadsheet and rename it to '2'.
- Select cell B3 in the new spreadsheet '2' and paste the data using Ctrl + V.
- You can format the column size by using the keyboard shortcut Alt + H + O + I, allowing your column width to auto-adjust.
- Click on Stop Recording from the tab.
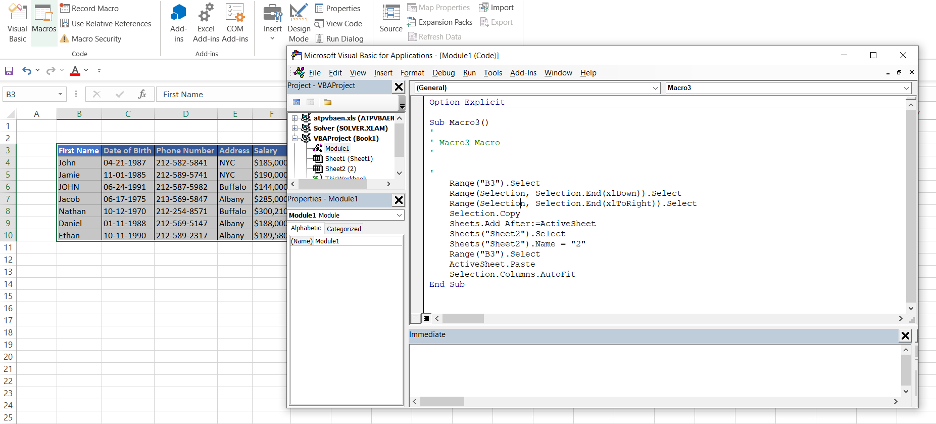
Congratulations on recording your first macro! You can review this code by going to Visual Basic and clicking on the dedicated module.
Before running it, though, we advise you to delete spreadsheet '2' and save the workbook on your desktop before closing it. A quick reminder that you must always save your file as 'Excel Macro-Enabled Workbook (*.xlsm), or your macro won't run.

Now open your workbook. Click on Macros from the Developer tab or press Alt + F8, select your macro, and click Run.
You will see that your macro runs successfully. But wait, let's try it again. Click on Macros from the tab and run your macro. You won't get the desired result, but instead, it will display this error:
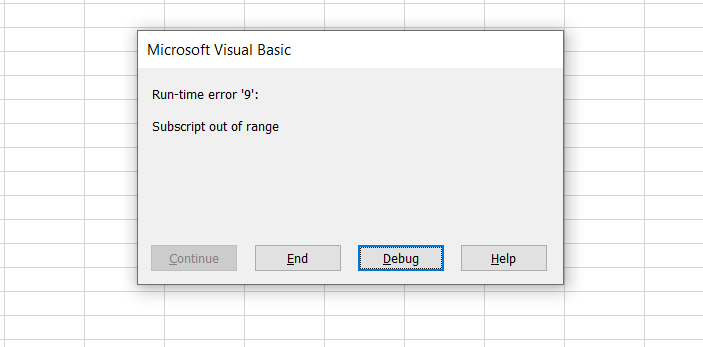
This error basically means that the VBA code could not find a particular object in our workbook. Below is the code for the macro that we had recorded to copy and paste the data into different spreadsheets.
Notice the code lines "Sheets("Sheet2").Select and "Sheets("Sheet2").Name = “2”? These two codes are responsible for the error in our VBA code.
On investigating the code and our workbook, we understand that we have already renamed Sheet2 as "2," making it non-existent, and any subsequent spreadsheets will have a different name, say 'Sheet3', 'Sheet4', 'Sheet5' etc.
So, if you need to run the macro again, you need to close Excel and run it after opening it again. Quite tedious, right? Instead of minimizing our repetitive task, it is maximizing them.
Therefore, most VBA programmers and financial analysts prefer to write their own code or make changes to the code after recording it to make it more dynamic, so it can be used any number of times without closing the macro-enabled Excel.
Since macros are codes written in a programming language, they're susceptible to invading your privacy. Most of the macros have permission to access different system files and folders and exhibit potential risk even to viruses.
If you run a macro written by an unknown person, it can potentially delete all your important files on your desktop or even corrupt your operating system.
Thus, Excel disables all the macros by default from a security point of view. The macros can be enabled via the security warning bar by following the below steps:
- Most of the macros that you create will be trusted sources, and hence you might not receive security warnings.
- However, any third-party macro that you use will display a security warning as soon as you open it.
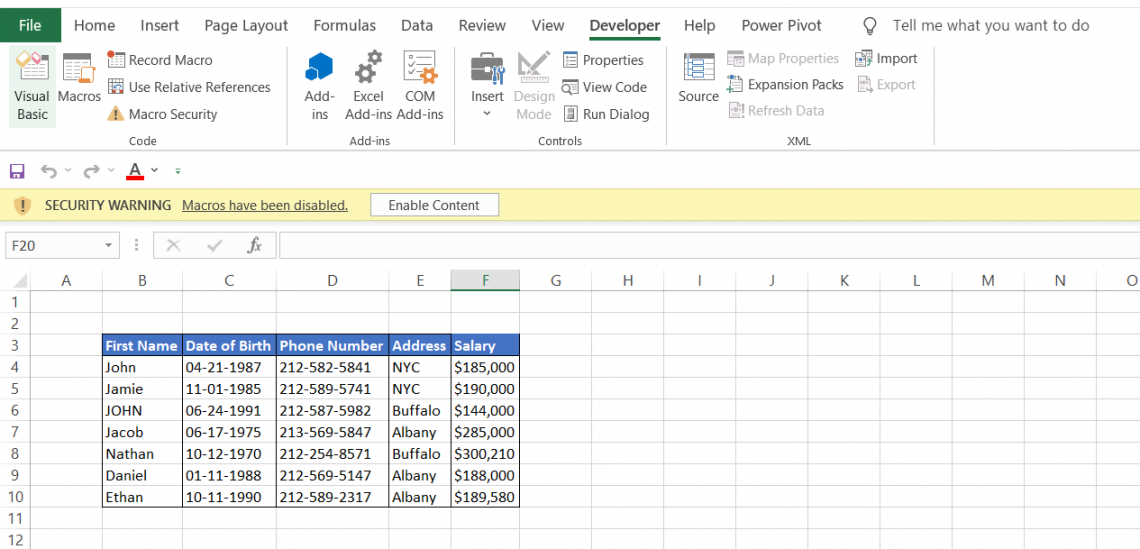
- Just click on the Enable Content button if you trust the source of the macro to turn it on. You won't receive a security warning the next time you open the file since it will be a trusted document.
- If you do not wish to enable the macro in the workbook, just click on the 'X,' and it will close the security warning. However, if you try to run the macro again, it will ask you to reopen the workbook and enable the macros.
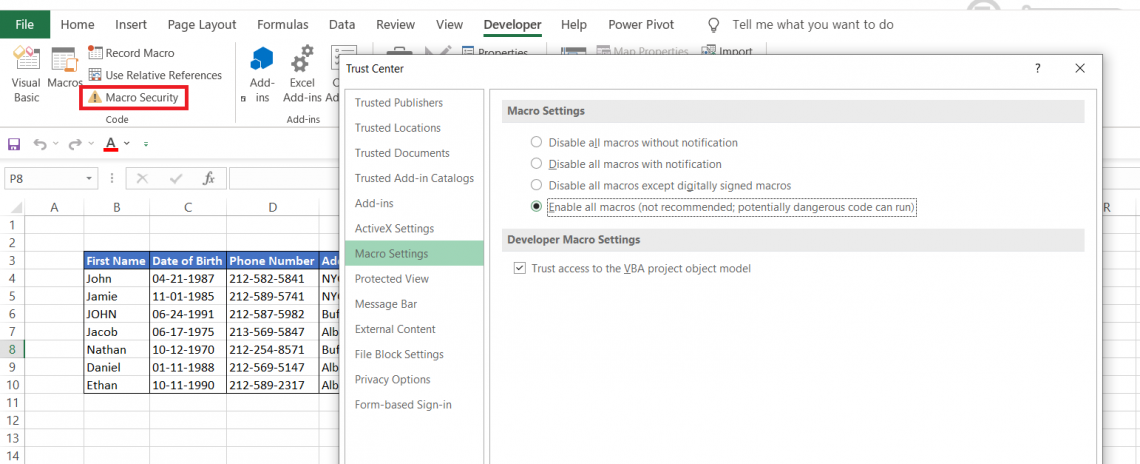
An analyst working in a trusted environment can also avoid security warnings by clicking on Macro Security and selecting the radio button to enable all macros.
Add-ins Section in the developer tab
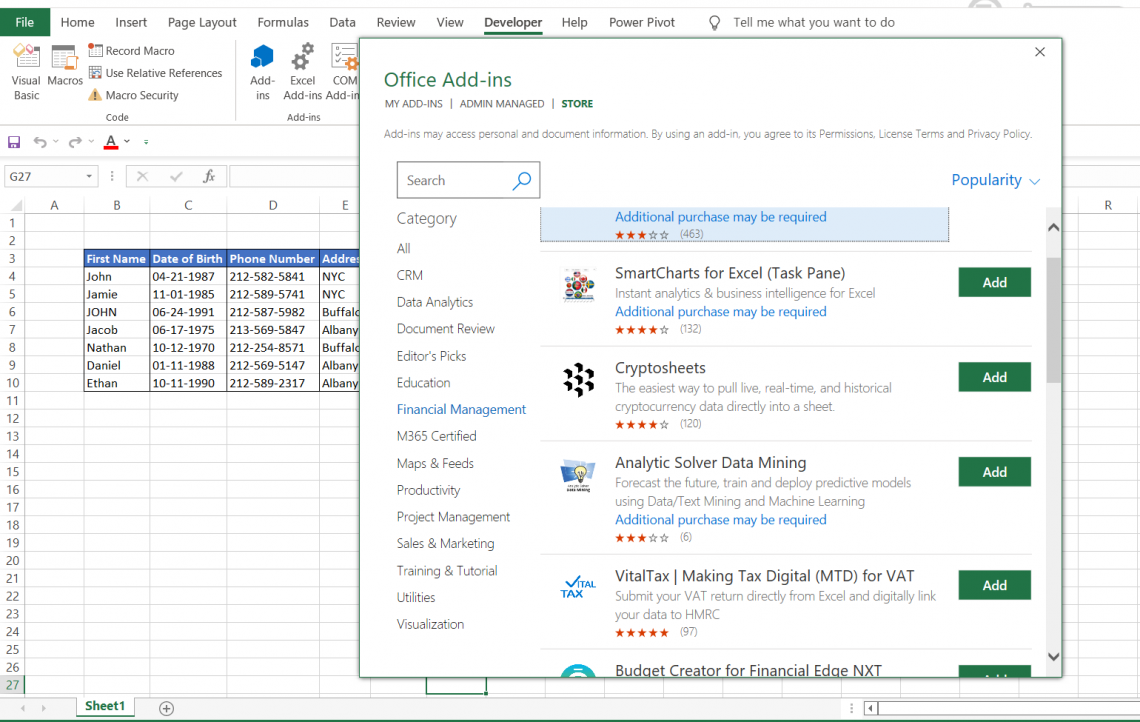
Add-ins are the programs that give additional functionality when attached to the Excel file. Once the add-ins are installed, they work across different workbooks.

Add-ins and Excel Add-ins allow web technologies to interact with the Office applications across different platforms. They are similar to Google extensions and were previously called Office Apps. They replicate the role of an assistant helping you with tasks that the Office cannot do easily.
For example, if you wish to pull the real-time live cryptocurrency data in your workbook, just click on Add-ins and navigate in the financial management section of the store. Click on Cryptosheets, and it will add a tab at the end of your menu bar in Excel.
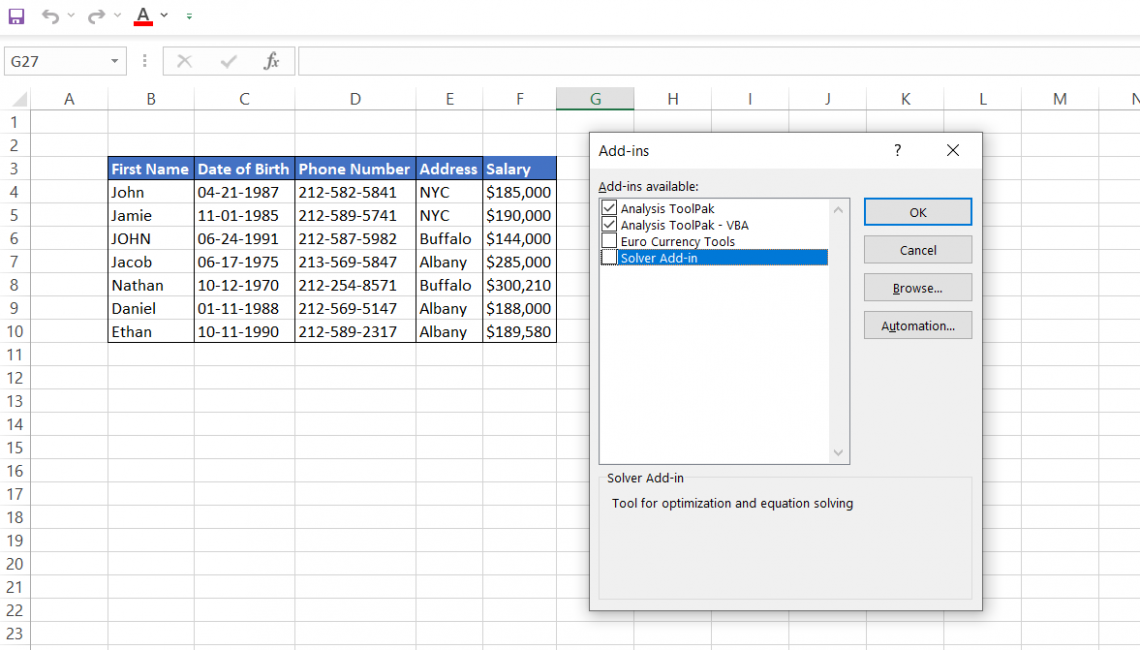
Analytical tools for statistics, as well as automation add-ins, can be included in the workbooks by clicking on Excel add-ins and marking ticks on the required tool packs.
Controls Section in the developer tab
The controls section allows an individual to add customizable objects that interact with the data in user forms or documents.
For instance, many online forms are devised with radio buttons that provide only a unique choice of option selection for the question by the user.
You can find the controls section in the Developer tab of Excel.
There are two categories of controls in Excel, i.e., "Form Controls" and "ActiveX Controls." Form controls are easier to use as compared to the ActiveX Controls, which are predominantly used in Excel VBA, showing up as objects in our macro code.
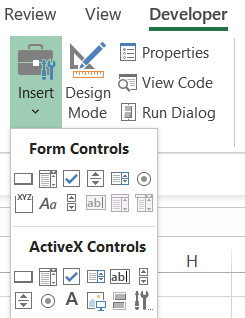
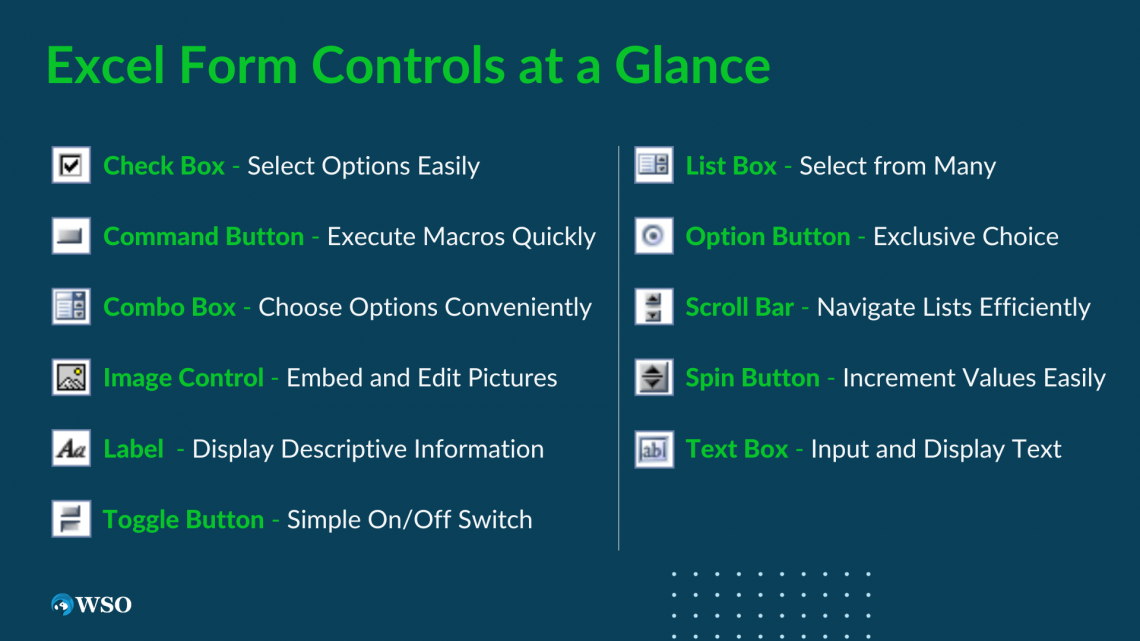
There are eleven different types of controls in the Developer tab. Let us explore how different controls work:
1. Check Box
Check Box, also called tick box or selection box, is a control tool that displays the selected option using a checkmark in a little square box. The check box is used to select or deselect single and/or multiple given options. To insert a checkbox in your Excel, follow these steps:
- Click on Insert in the Developer tab and select Check Box under Form Controls.
- To insert the Check Box, click on the cell where you need it.
- The next step is linking the Check box to the desired cell. Simply select format control by using the mouse and right-click on the checkbox.
- In the Control tab of the format control dialog box, select the radio button for Checked and link the cell reference for Check box, say $A$1 for this instance, and press OK. The value of Checked ensures that the checkbox has a tick whenever you open the workbook in the future.
- To check if your checkbox is linked to cell A1, try to tick and untick the box. Your checkbox is working if it shows the value TRUE in cell A1 when ticked and FALSE when the box is unticked.
2. Command Button
Command buttons or push buttons are used to draw buttons that execute or run an assigned macro. If a workbook contains multiple macros, it can sometimes be inconvenient to run the desired macro from the Developer tab or by using Alt + F8 and, at such instances, creating a command button and assigning the macro to it eases the task for an Excel user.
3. Combo Box
Combo box is an interactive tool that allows you to add items of your choice and select them via the drop-down list. The item can be selected by either typing in the text or by clicking on it from the drop-down list.
4. Image Control
Image Control is used to embed a picture such as JPEG or GIF allowing us to crop, move and resize it while letting us display pictures as part of the data in the spreadsheet. For instance, when using a company logo and employee photos on the employee attendance spreadsheets.
5. Label
A Label in MS Excel is a descriptive text that gives information or instructions to the user regarding the data in different rows and columns of the Excel. Labels are not interactive by nature and display only the values that are assigned to them. For example, "WallStreetOasis."
6. List Box
Like a combo box, a list box allows you to add items and lets you select a value from a set of many values. Despite the similarity in function, they are different in their appearances. A list box is scrollable and displays more values as opposed to a combo box with only one value.
A combo box will allow users to write text in the box, while a list box does not contain a text box to search for an item specifically.
7. Option Button
An option button, or also called the radio button, is a graphical control tool that accepts only a single response from the user from the several options in the set.
Any attempt to select another option automatically deselects the previous one, meaning that option buttons are mutually exclusive, allowing only one response from the user.
Example: Like a coin toss that will yield either a head or a tail, an option button will allow only one response from the user.
8. Scroll Bar
The scroll bar allows you to increase or decrease the value of the linked cell. You can easily navigate through a large list of items by using horizontal or vertical scroll bars as well as the up and down arrow.
The interactive nature of the scroll bar allows a user to scroll to select the values from the given list rather than manually typing the value, thereby saving time for the user.
9. Spin Button
Spin buttons are similar to scroll bars allowing the user to make increments or decrements of value by clicking on the up and down arrow, respectively. This helps to quickly change a value or change a range of values such as number increments, date, or time.
10. Text Box
A text box allows the user to insert text in them. By default, it allows you only to add a single line of text; however, you can modify it to hold more information. It can be static or dynamic, depending on the type of input you expect from other users.
For example, you can make the text boxes dynamic by creating a user form that will accept age only as a number. Any alphabetic response will be rejected by the form built in the spreadsheet.
11. Toggle Button
A toggle button is used to indicate a condition in Excel either as a Yes/No or acts as an On/Off switch. When the toggle button is switched on, it enables the particular condition and disables it when switched off.
For example, a toggle button can be used to hide and unhide the rows in a spreadsheet, charts, or pictures.


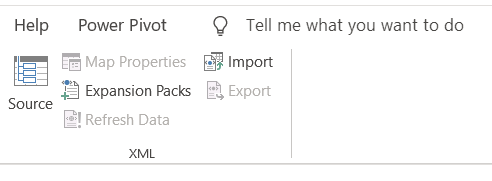
XML Section in developer tab
XML (Extensible Markup language) is a human- and computer-friendly format derived from Standard Generalized Markup Language (SGML) that is used for representing structured information. An XML tag identifies the data and stores it, as opposed to the HTML tag, which is used to display the data.

If you have worked on HTML codes, you might be aware that the two tags <title> and <body> respectively display the text in different sections of the webpage. On the other hand, irrespective of the position, an XML tag allows you to store the data using self-descriptive tags or language that best suits the application.
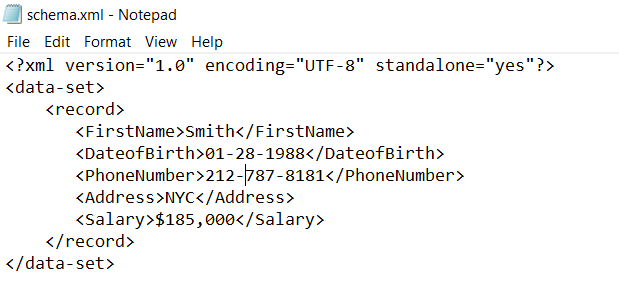
For example, a part of XML data written as <phone>212-877-298X</phone> in Notepad means that an element is a phone number as described in the XML tag.
For example, let's convert the data below into an XML data file:
- First, we need to create a schema, i.e., describe the structure of the XML document in applications such as Notepad.
- Add the following lines once you open the Notepad. You might notice that we have used the column names as our tags. However, you can use any name you want for the tags. Using the column name tags makes it easier to remember the data while referencing it in our dataset. Save the Notepad file as schema.xml.
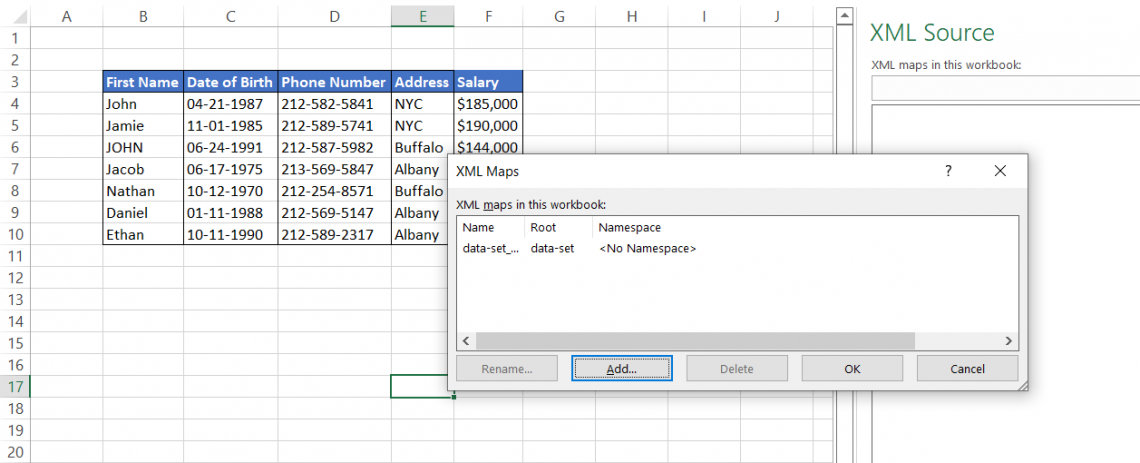
- Open the Excel spreadsheet on which you are working. In the XML section of the Developer tab, click on the Source to open the XML Source task pane, which will be on the right side of your screen.
- Click on XML Maps to add your schema.xml file. Once you add the file, your screen will look like this. Click OK.
- This will import the XML data that you can see in the XML source task pane. Now just drag the elements onto the worksheet (Row 11).
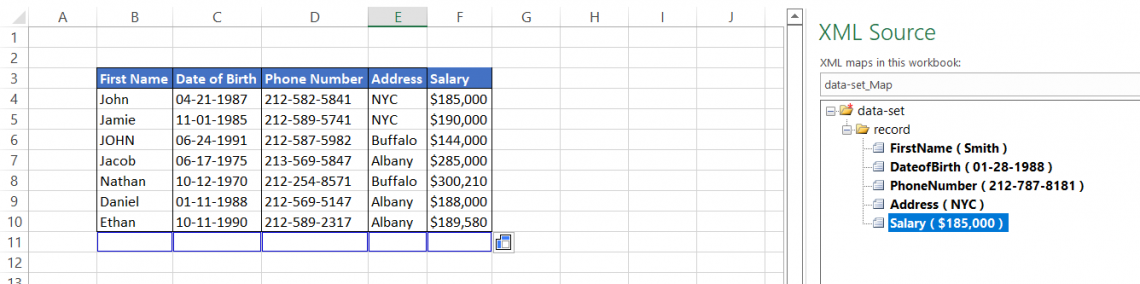
- Now go to the Developer tab and click on Import from the XML section. Again, select your schema.xml file, and click on OK. You will find that the data is imported into our spreadsheet.
XML has very little utility in MS Excel unless you are working on other applications that require XML or have a good understanding of XML tables.

Researched and Authored by Akash Bagul | LinkedIn
Free resources
To continue your journey towards becoming an Excel wizard, check out these additional helpful WSO resources.


or Want to Sign up with your social account?