Using Flash Fill in Excel
A feature in Microsoft Excel that aids in automating data entry tasks by analyzing the information the user enters, and the feature automatically fills the data by identifying the pattern.


What Is Flash Fill In Excel?
Flash Fill is a feature in Microsoft Excel that aids in automating data entry tasks by analyzing the information the user enters, and the feature automatically fills the data by identifying the pattern.
We often work on workbooks that are formatted and structured in a way that makes them difficult to interpret. This article covers the feature in Excel responsible for arranging data in the right format.
There will be situations when you are being handed down a workbook or when you have imported the data from external sources; the information present is not arranged according to your liking and is vague.
Also, there will be multiple instances where the data received is disorganized in terms of format, such as text in all uppercase or all lowercase, date in non-date format, contact numbers with no parentheses, and columns filled with multiple formats.
There are some ways to address the issues of poor formatting and structuring. One such way is to enter the data manually, that is, by hand in the way one needs. Well, this task will be easy for a small amount of data.
But, in the case of large amounts of data, it becomes time-consuming and exhausting and seems like an impossible task.
Indeed, there are ways to solve these problems by:
- Converting Text to Sentence Case: Generally, we have UPPER() and LOWER() functions in Excel, where all the uppercase (or lowercase) text is converted into a sentence, with the first letter in Uppercase. However, the command requires many arguments, which may result in negative outcomes and is challenging to execute.
- Converting Non-date format to Date Format: To execute the command, we need to work with various functions such as LEFT(), RIGHT(), MID(), and DATE(). Therefore, executing and entering the formula will become troublesome, and the chances of errors are high.
- First Name and Last Name Extraction: We will be working with FIND() to identify the space between the first name and last name, RIGHT() for the last name, and LEFT() for the First name. Yet again, the process becomes complex to understand, interpret, and execute.
- Flash Fill is a powerful feature in Microsoft Excel that automatically fills in values in a column based on patterns identified in adjacent columns.
- It saves time and effort by eliminating the need to manually enter or write complex formulas to extract or manipulate data.
- Flash Fill is enabled by default in Excel, but users can turn it off or adjust its settings in the Options menu under the Advanced tab. Users can also use the keyboard shortcut Ctrl + E to apply Flash Fill manually.
- While Flash Fill is a powerful feature, it may not always recognize complex patterns or variations in data. Users may need to manually adjust or correct the suggested values in some cases.
Understanding Flash Fills
Flash fill is an incredible feature responsible for recognizing the pattern of data from the preceding activity. It is primarily used to split the data into columns but allows users to combine it into columns.
For instance, if you have a field with name and ID combined, you can use the feature to separate them into two columns, such as Name and ID, which will add more meaning to the data.
Similarly, if you have a field with name and ID in two different columns, we can combine them into one single column by just clicking a shortcut key.
Now don’t get worked up; we will break out the process in detail to understand it clearly.
Let’s say Column A contains source data, and you want to format it in column B; you will enter the data in the format you require in column B to help excel recognize the pattern, and if you start entering the data in column c, the pattern is recognized.
Excel, by default, recognizes the pattern and will fill the data automatically as a flash, disregarding the volume of the data.
Process:
- Check if the original data column has a Heading
- Enter the Heading for the new data column
- Enter the first value corresponding to the first cell in a new data column
- Similarly, in the second cell, start entering the value, which excel will recognize instantly and displays suggestions.
And that’s it; press enter, and the cells will be filled with new data.

How to enable Flash Fill?
The feature is enabled by default. If not, some steps will help you to enable it.
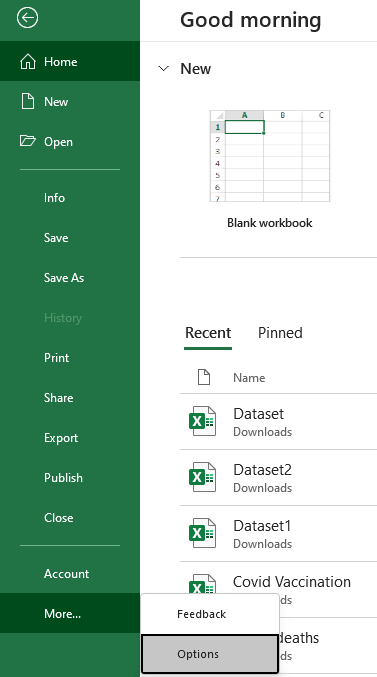
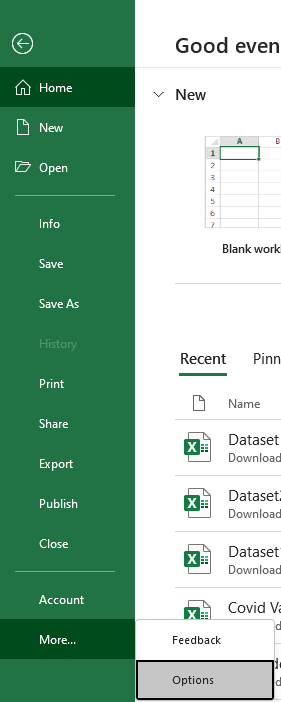
1. Go to File>> More>> Options
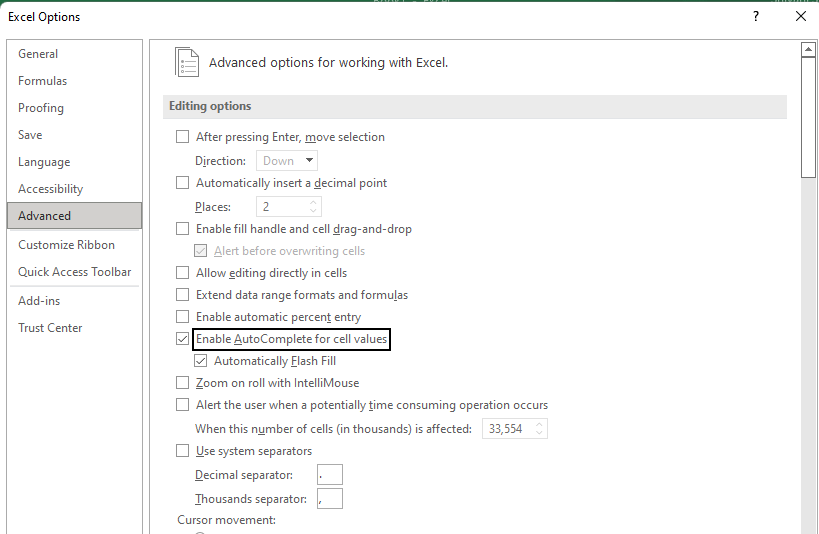
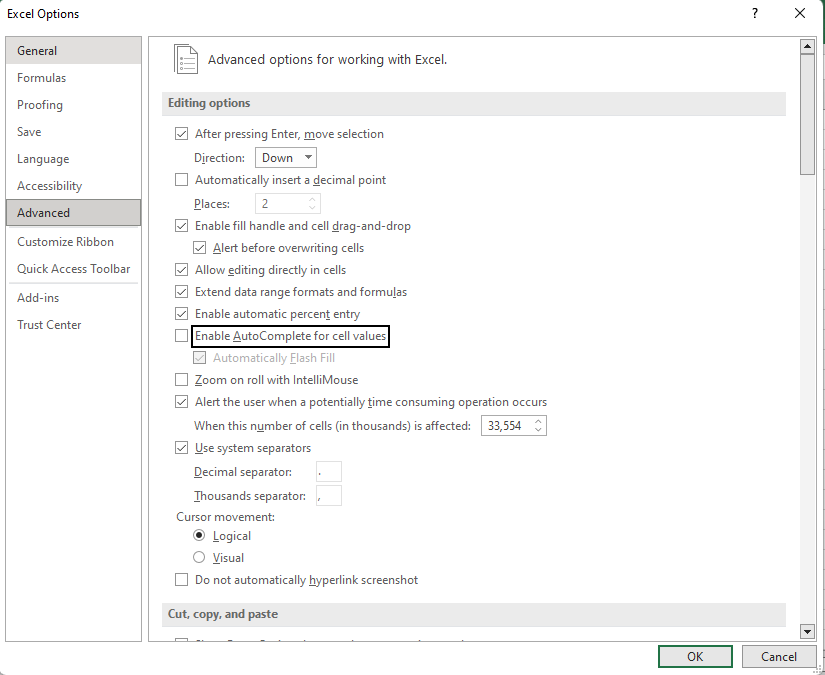
2. Options>> Advanced>> Enable Autocomplete for cell values
Flash Fill: Where is it?
Well, if you are specifically looking for an icon on the ribbon bar for the option and can’t find it. Let me help you.
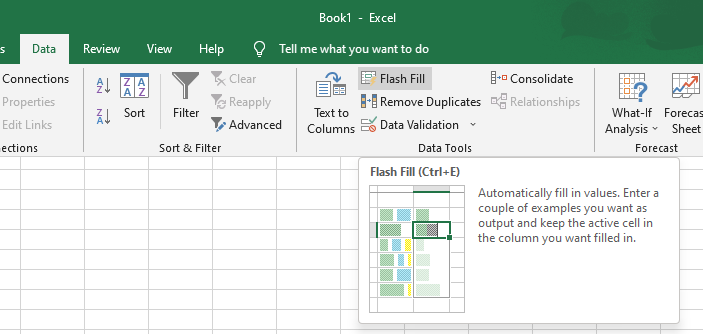
Go to the Data Tab and scan thoroughly from left to right. An icon with a lightning or flash symbol is in the Data Tools box.
Simple, the syntax is Data>> Data Tools>> Flash Fill
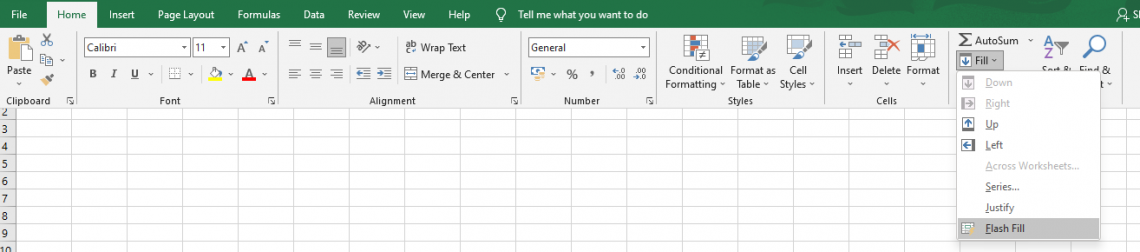
We can also find the Icon on the Home Tab.
The sequence is Home>> Editing>> Fill>> Flash Fill.
How to disable Flash Fill?
Although some Excel applications have this feature enabled by default, some have it disabled. Well, we can turn it on manually, as explained earlier. However, users sometimes turn it off when uncomfortable and lack confidence.
Steps to disable:
Go through the steps below to fully understand disabling the feature.
Step 1: On the Ribbon Bar, go to the file menu. Toward the end, we can see More options. Click on it, and we can see Feedback and Options. Look at the image below to get more information.
Syntax: File>> More>> Options.
Step 2: Click on Options, and Excel options will appear in a dialogue box. Move to Advanced and uncheck “ Enable AutoComplete for cell values,” which promptly disables the flash feature.
Syntax: Options>> Advanced>> Enable AutoComplete for cell values.
Step 3: Click Ok. You have disabled the flash feature successfully.
Flash Fill Methods
There are different methods featured in Excel to complete a particular course of action faster. Four popular methods are known for ease of execution, saving time, and ensuring efficiency.
We shall look into the methods with examples to get a clear picture.
Method #1: Using Data Tab
Step 1: Enter the data manually so that Excel can recognize patterns.

Step 2: Now, select the cell in which you entered the data and go to the Data tab>> Flash Fill. The data will be entered automatically.

Method #2: The Shortcut Key for Flash Fill is Ctrl+E
This shortcut key is a game-changer and will help us achieve the task easily; all we have to do is memorize the shortcut key. This is the easiest and most commonly used method to execute this function.
Step 1: Enter the data manually in the new column.
Step 2: Select the cell of the new column and enter Ctrl+E. That’s it. Relax

Method #3: Auto Suggestions
We are all quite familiar with this auto suggestions feature, and every time we come across it, we will turn a blind eye and acknowledge it.
Step 1: Enter the data per your requirements in a new column.
Note: Sometimes, to recognize the pattern, we need to enter the data into two or more cells to recognize the pattern.
Step 2: The flashes of suggestions appear, and press enter if the information is arranged according to your liking, as shown in the picture below- press enter.

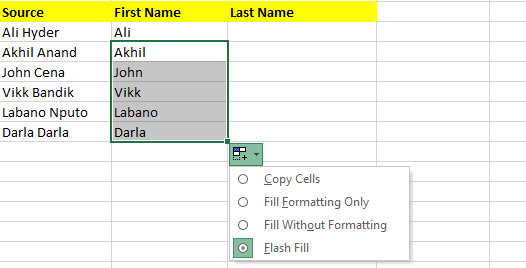
Method #4: Fill Handle
Yet another easy way of using the Fill option is while you are working on the cells in the worksheet.
- Select the cells where the feature of the Fill option should be executed.
- Enter the first entry manually.
- Now, we can see a + Plus sign when we move the cursor to the bottom right corner.
- Drag the + Symbol, where we can see some formatting options, including Flash Fill.
Flash Fill Examples
Let’s consider some examples to demonstrate how to use this feature.
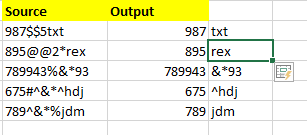
Example #1: How to use Flash Feature to extract text
Your Team lead assigned you a task to structure the data, and the data volume is enormous. Wondering how to overcome this? We got you. The job is done simply by pressing a key.
In the previous example, we saw how to extract text from the source. Just inject the data into a new column, select the cell below press ctrl+E. The task is done.

Example #2: How to combine data or text using Flash Option
There are instances where the data is scattered across the workbook, and it is your job to combine it and put some meaning into it. So, not only the Flash feature is used to split data, but also it is used to combine data.
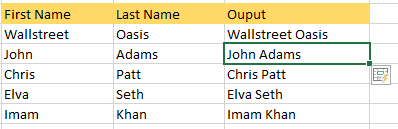
We did the same thing as in the earlier example; we entered Wall Street Oasis manually, selected the cell below, and shot ctrl+E.
Example #3: How to change case using the Flash feature
Nevertheless, the process of getting the output is the same.
But, we need to work on changing the case; we have to inject the data as per your criteria (lowercase) and press CTRL+E.

Upon placing the cursor under the cell Dakota and clicking ctrl+E, we will achieve our solution.

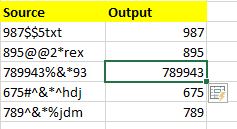
Example #4: Using Flash Feature to extract numbers
There are times when the records are combined in multiple formats like text, numbers, and alpha characters. So, we can use this fill option to separate them as you wish.
Note: We need to enter formatted text into at least two cells so that excel will understand the pattern.
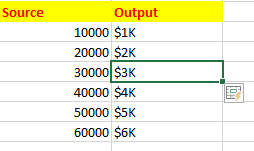
Example #5: Multitasking with Flash Feature
There might be situations where you want to add two characters at a time. This is also possible using the FF feature. Let’s look at an example to have more context.
The source code in the figure below doesn’t contain the currency sign. So, we have added a currency sign and the letter K simultaneously.
Note: We need to add manually to at least two cells.
Flash Fill Benefits
The software's features and tools are designed to benefit users. Similarly, this feature is designed and implemented to improve data irregularities. Let’s have a look at some of the benefits below.
- Data Prediction and Transformation: Prediction in the sense that this feature predicts the patterns and, by default, suggests the users complete the action with a single click. Then, the data is transformed into the pattern identified and informed to the users through flashes.
- Data Extraction: This feature's main aim is to extract the data required by the user. Generally, the source is bundled with data in multiple formats; the flash feature extracts the data by identifying patterns from the signs given by the user. The result is the information used for processing, storing, and decision-making.
- Concatenation: Concatenation implies an activity of linking. Here, the data, when entered manually, Excel with the flash feature algorithm analyzes the patterns and then suggests the users. If users acknowledge it, the output is displayed. This whole process of linking is an example of concatenation.
- Data Cleaning: Data cleaning removes incorrect, unstructured, unorganized, incomplete, and duplicate data from a worksheet. The data imported may have undefined characters and spaces, and it is the role of the flash option to clean and format the data so that it is interpreted easily.
- Prevents Errors: If not for this flash feature, the user must type the data manually, which becomes a tedious, time-consuming task. Moreover, the chances of errors are high, particularly with large amounts of data. So, the flash feature, with the auto suggestion and flashes, helps the users prevent incidents of errors.
- Saves Time and energy: This feature is much easier to execute with the shortcut key. Imagine the time it takes if the user types every record and the energy required. So, without much hassle, the flash feature fills up the data according to user conditions in seconds.

Excel Flash Fill Limitations
It is important to note that every feature will have issues functioning at some point. Some constraints might restrict the operations.
Also, note that every tool is built on assumptions and cannot perform beyond them. So, let’s understand the limitations.
- Results are Static: Any modifications to the source code will not be reflected. This is because the updations and corrections made in the original were not imitated in the new columns. Unlike the formulas, where any source changes are made, the results are updated; this feature will not return any changes, additions, or alterations.
- Failure to recognize a pattern affects the output: When the source is formatted and organized differently, Excel may fail to identify and understand the patterns. In these cases, default values, wrong output, or an error message will be displayed.
- Blank Cells: If your source contains blank cells, spaces, and non-printable characters, this feature will ignore those cells. Also, it is hard to point out if there are non-printable characters, and then if the feature is executed, a random or default value might be generated. These incorrect results will affect your decision.
- Fails to convert numbers into numerical format: It is important to note that when the numbers are formatted, the datatype of the numbers changes and will be considered as string values, i.e., alphanumeric string values.
- Complies only with Vertical Alignment: Flash feature l is not applicable when the source data is aligned horizontally. Instead, the data should be aligned vertically to carry out the feature.
- Flash Fill and AutoFill: Flash fill is an important feature responsible for recognizing patterns and reflecting them to the user. Autofill is also a feature where excel guesses the next values to be inserted by comparing them with previous values and permits you to create entire rows and columns based on values from previous or other cells.
Conclusion
The flash fill feature was first released in the Office 2013 edition. The older editions, i.e., before 2013, 2010, and before, do not have this feature. However, all the editions after 2013,i.e., office 2016 and 2019, have this feature.
A pro tip for arriving at the patterns in the way you desire is to enter the text in the desired format in the first cell, place the cursor in the next cell, and click Ctrl+E. That’s it; you have learned flash fill.
Despite its limitations, the Flash feature is one of the most used tools in Excel. It is known for arriving at results efficiently. Users typically use this feature to save time and arrive at accurate results, reducing reporting issues at later stages. Go through the methods and examples once again to have more context.
Also, go through other fill options, such as auto-fill, which has almost the same functioning as the flash option, which will help while working on analyzing and interpreting the data for better decision-making.
The article has covered almost all the information one needs to know while working with the Flash feature in Excel. Now that you have reached this page, you must have realized the feature's importance and applications in detail.
So, what are you waiting for? Open your Excel and start practicing.
Free Resources
To continue learning and advancing your career, check out these additional helpful WSO resources:


or Want to Sign up with your social account?