VBA If Else
A tool that helps you make decisions in your code based on certain conditions


VBA If Else statements
VBA If-Else statements are conditional statements that allow for the execution of specific blocks of code depending on whether a condition is true or false.
The If…Else function is an inbuilt logical function that can be used through the Visual Basic Editor available in the Developer tab. By using the If….Else statement, you can check whether the condition gives you a TRUE as a boolean value if a particular code is executed and FALSE if the code is not executed.
The If…Else statements can also incorporate Else if statements in between that test a new condition if the initial conditions fail to give a TRUE value, thereby generating a sequence of test expressions.
The If Else statements in VBA enable the program to create logic and adeptly deal with multiple variables, whether dynamic or static.
- VBA If-Else statements are pivotal for directing program flow based on specific conditions, executing tailored code segments accordingly.
- VBA's 'If', 'ElseIf', and 'Else' structures offer a systematic way to handle multiple conditions, enabling diverse code execution paths.
- Logical operators like AND and OR within VBA If-Else statements allow for intricate condition handling, enabling adaptable decision-making.
- The use of logical operators amplifies the program's ability to handle nuanced conditions, refining decision-making capabilities.
- VBA If-Else statements, combined with logical operators, streamline program logic, facilitating efficient decision-making and tailored code execution.
If Statement Structure in VBA
The If…Else statement can be nested ‘n’ a number of times when using the statement in the VBA script.
The syntax for the If…Else statement is as below:
If (test_expression_1) Then
Result_1
Elseif (test_expression_2) Then
Result_2
Elseif (test_expression_3) Then
Result_3
Else
Result (if neither conditions are satisfied)
End If
where,
- test_expression_x = test expressions for which the code needs to be executed. These are evaluated in the given order as mentioned in the VBA script
- Result_x = the result obtained when the test expressions are found to be TRUE
- Result = the result obtained when all the previously evaluated conditions are found to be FALSE
- End If = indicates the end of If...Else statement without which the VBA script becomes invalid.
Note
The six logical operators Equal to (=), Not equal to (<>), Greater than (>), Less than (<), Greater than or equal to (>=), Less than or equal to (<=) can be used to test conditions.
Basic VBA If Else script
Based on the test expressions, the VBA script generates a TRUE or FALSE result by evaluating the conditions in the given order.
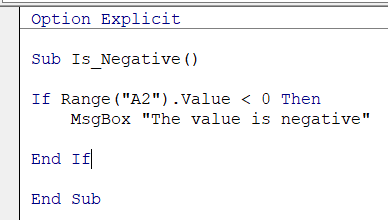
For example, assume that you need to determine whether the value in the cell ‘A2’ is less than 0. Then, you can use the VBA MsgBox function to display your message if the value in your Excel spreadsheet satisfies the conditions to give the resultant value. For example, you use the following VBA script in Excel.
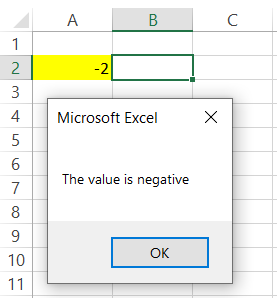
When you run the code using F5 or by clicking on Macros in the Developer tab, you will see that the Excel windows displays a message box as below:
Now try changing the value in your Excel spreadsheet to a positive number such as 2. Do you get the same result? Probably not, as we have not given any instructions to Excel as to what should be done in case the value is zero or positive.
The code will run just fine but will fail to give you any result due to the inadequacy of test expressions.
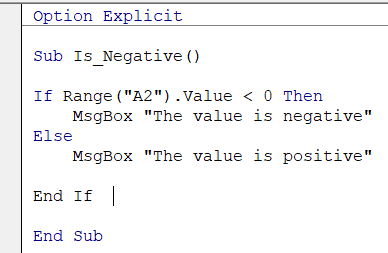
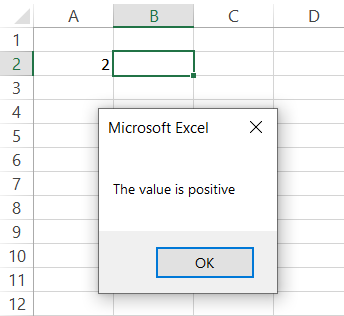
Now add another line of code in your VBA script to let Excel know if the number is not negative. It should display the result as ‘ The value is positive’. You can represent this in the VBA code as below using the Else statement.
Now run your script using the F5 when the VBA editor is open in your spreadsheet. The message box will display the following text:
VBA If ElseIf Else script
The purpose of the ElseIf statement is to specify a new condition if the first condition does not return as TRUE. The ElseIf creates an additional conditional statement in your VBA script, helping to build more complex logical statements to the required result.
To simplify, assume that the ElseIf acts as the series of pathways in a maze with only a single entry and exit point each.
If the path is correct (i.e., if the ElseIf condition is fulfilled), the person will reach the end of the maze (end of VBA script) else, they will wander in the maze until they find the exit (satisfies else condition).
Below is an example of the VBA script that can be used to compare two numbers in cells A2 and B2.
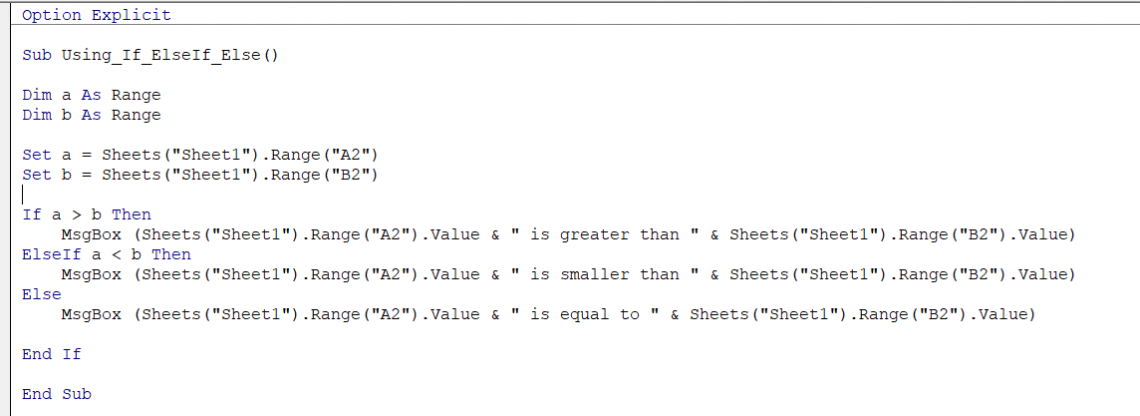
Input any two numbers in cells A2 and B2, respectively. Now go to the Developer tab, click on Macros, and run the macro named Using_If_ElseIf_Else(). For example, if you have 10 in cell A2 and 12 in B2, Excel will display the Message box that reads as: “10 is smaller than 12”.
It doesn’t matter what numbers you input in both the cells (apart from text, e.g., two, hundred, thirty-five). The Message box will accommodate the new number and display it as a result of the conditional expression.

This is a simple example of dynamic VBA code that gives far more flexibility while working rather than static code that has upper and lower limits to the dataset.

Using AND/OR in VBA IF Else Statement
Previously, we saw how you could test a single condition that gives you the result for the mentioned conditions if satisfied. However, there is always a case of uncertainty by using a single condition regarding the result if the dataset is complex.
By using logical functions such as AND/OR in your conditional statement, you can derive results from multiple conditions dependent on each other.
The syntax of using AND with the If…Else statement is:
If (test_expression_1) AND (test_expression_2) Then
Result_1
ElseIf (test_expression_1) AND (test_expression_2) Then
Result_2
Else
Result_3
End If
For AND, when the conditions for both the expressions are met, the VBA script runs the code to obtain the result in Excel. However, even if one of the conditions for the test_expressions is not fulfilled, the code will move onto the next test_expressions in the sequence due to the FALSE result.
The syntax of using OR with the If…Else statement is:
If (test_expression_1) AND (test_expression_2) Then
Result_1
ElseIf (test_expression_1) AND (test_expression_2) Then
Result_2
Else
Result_3
End If
If you are using OR in your If...Else statement, your VBA code will give you the result as TRUE as long as one of the conditions of the test_expression is met. If both the conditions fail to give Boolean value as TRUE, the code will only move onto the next sequence of conditions mentioned in your VBA code.
Let’s explore examples for how AND/OR are used along with the If statement.
AND in If Statement
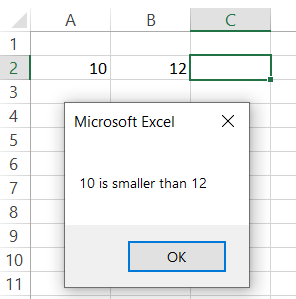
Suppose that you work in a bank in the mortgage lending department. Every day you receive a spreadsheet from your manager containing information about the loan applicants such as the Applicant Name, existing loan amounts, and their Credit score.
Let’s assume that you want to approve the loan for applicants based on two criteria:
- The loan amount is less than $15,000
- The credit score is higher than 720
If the applicant passes both criteria, they will definitely be offered the loan by your bank.
But now the issue that arises is that you need to review thousands of applicants every day and must report to your manager before the end of the day on the same.
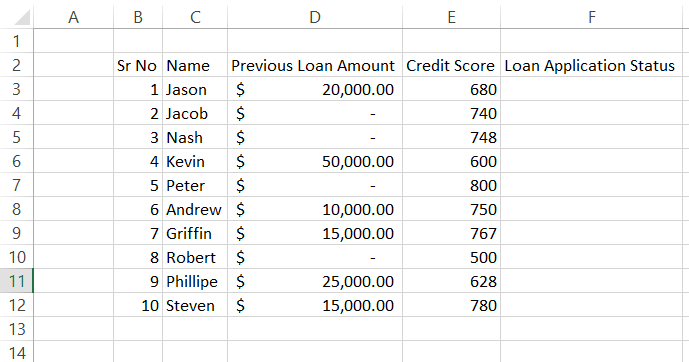
This is how the Excel spreadsheet looks:
In this case, you can use a VBA code that uses AND as a logical function between your test expressions, meaning the result will be displayed for the test expressions whose conditions are first met in the If statement. The code looks as below:
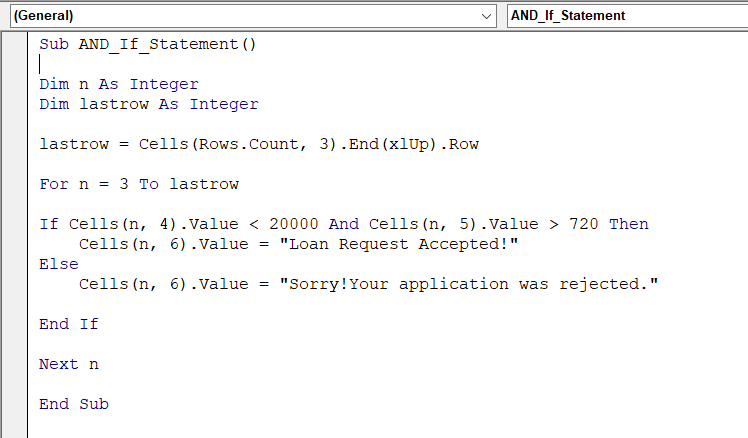
Let’s break down the code to understand it better. Firstly, we have declared two variables - n & last row, which would be used to loop through our dataset and find the last row of our dataset.
The code to find the last row in VBA is last row = Cells(Rows.Count, 3).End(xlUp).Row
So assume that the value in cell C18 is Andrew.
The last row code will basically count all the cells in the third column, assume the value of the last cell in the third column of the spreadsheet and then jump up to the next value in the up direction, which is not empty (similar to using Ctrl + Up arrow key in spreadsheets) since C18 is not empty, the last row changes to the 18th row of the spreadsheet.
This dynamism in the code helps to cope up with the changing dimensions of the dataset. Next is the application of the ‘For’ loop. You can find a more detailed article on ‘For’ loops here.
A ‘For’ loop enables you to reiterate through the predetermined range of cells. Here, we loop through our row starting from the 3rd row till the last row of our data.
Finally, once we add the loan lending criteria in the If statement along with the AND function, run the Macro, which will display the result as:
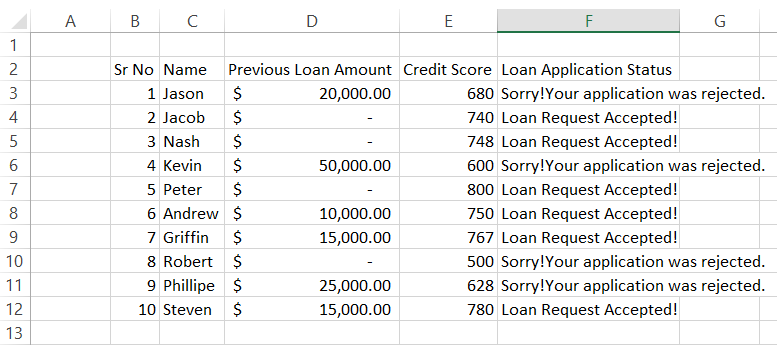
With just a single click to run the Macro, now you can easily filter out the applicants to which your bank can extend the loans.
OR in If Statement
Assume that a competitor bank tries to capitalize on the loan lending market due to your bank’s stringent policies. You suggest to the bank CEO a risky approach where you accept loan applications even if the applicant passes either one of the criteria (*former Bear Stearns & Lehmann Brother employees reading this article will see flashbacks of the 2008 financial crisis).
The CEO approves it, and you get back to work. Due to flexible loan policies, you receive twice the number of applications you previously received.
Here we use the OR as our logical function between two or more conditions of the test expressions. We can use the same VBA script used for the AND function, but you need to change the AND for OR in your code. This is what your updated VBA code will look like:

Now run your macro by using keyboard shortcut F5. AS ILLUSTRATED BELOW, the VBA code will run and give you the result.
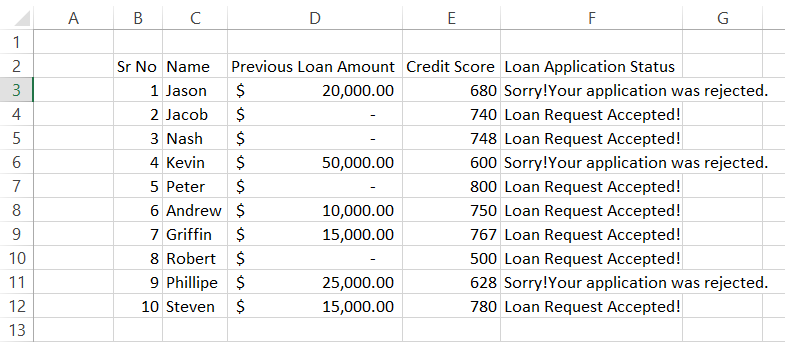
While Robert’s loan application was previously rejected altogether based on both criteria, the bank agrees to lend him the loan even with a low credit score this time as he does not have any previous obligations.
Nested If Statements
A nested If statement means that you can put one If statement inside of another to test more than one criteria or sub-criteria and increase potential outcomes for your dataset.
The syntax Nested If…Else statement is:
If (test_expression_1) Then
Result_1
If (test_expression_1) Then
Result_1
Else
Result_2
End If
Else
Result_2
End If
You can use the nested If either after the If statement or the Else statement depending upon the possibilities and the choices you make.
Using Nested If Statements
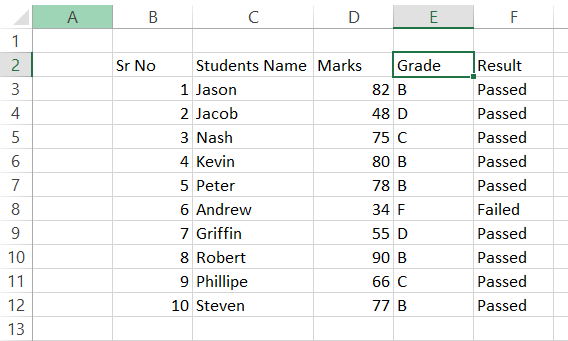
Let’s understand how the nested if statement works with the most loved example of whether the student has passed or failed based on the marks obtained and what grade they get in their class compared to their peers.
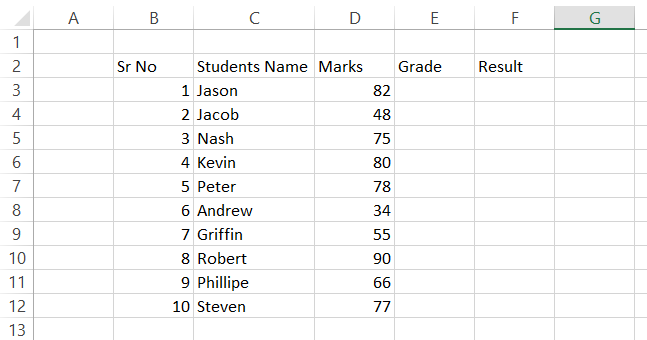
Given below is the dataset where the test scores for the students are given out of a total of 100. The teacher needs to find out which student meets the grade requirements so they can be promoted to the next class.
In this case, we have written a loop in the VBA script with the following conditions:
- A student with marks more than/ equal to 35 gets promoted to the next class
- A student with marks less than 35 fails the class and gets the ‘F’ grade
Additional conditions that we have set up if the student passes are:
- Student gets A-grade if they score above 90
- Student gets B-grade if they score above 75
- Student gets C-grade if they score above 60
- Student gets D-grade if they score above 40
- Student gets E-grade if they score =>35 and <40
The VBA code for the conditions in our Excel model is:
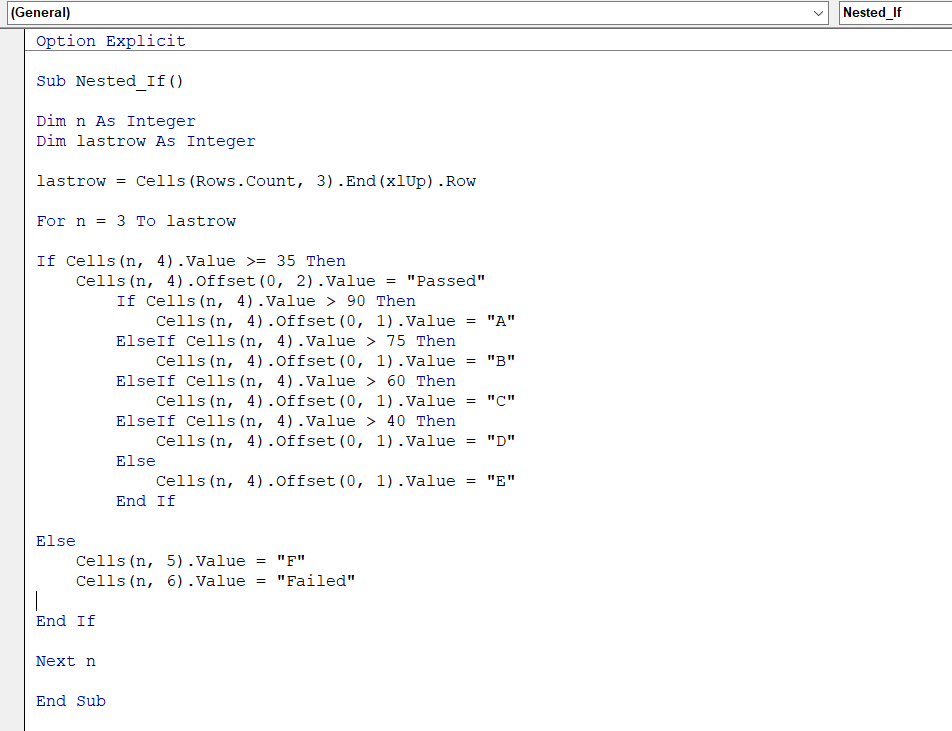
In our code, the last row line finds the last non-empty row in the third column (in this case, C12 = Steven). The for loop iterates till the last row in the third column. Next, we have nested If statements in our code.
The code for the inside If statement will run only if the condition for the outer If statement is met, i.e., >=35. If not, the code next in the sequence will run.
Similarly, the inner If statement will run in sequence until the correct condition is met for the cell, which is if the values in the D column are greater than our predetermined conditions.
We get the following result in our E and F column when we run the macro.
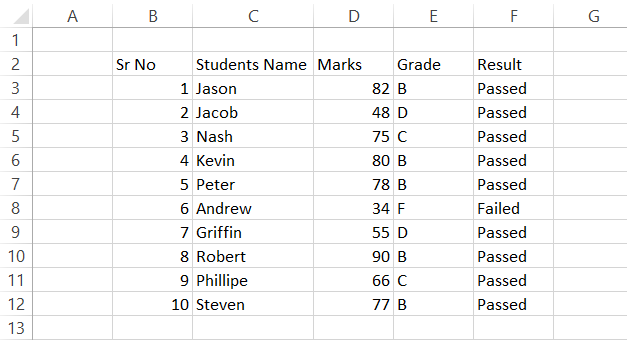
Based on our code, we find that Andrew fails the class as he gets less than 35 marks in his exams. Next, we know, Andrew drops out, gets a ‘small loan’ of million dollars from his father, and starts his own crypto fund. As of 2021, his returns in the crypto portfolio are 69,420%, so all’s well when it ends well!
So getting back to our code, we can also use the AND function instead of using a nested if statement as:
If Cells(n, 4).Value >= 35 AND If Cells(n, 4).Value > 90 Then
Cells(n, 4).Offset(0, 1).Value = "A"
It is really just a matter of preference and what suits best to your code. This gives you room to think logically as per your requirements of the VBA code.
VBA If Else Example
Suppose there’s an ad hoc task that can be automated. For example, you receive an Excel file, and the flow of your macro depends on the file name. How would you begin the code to let your macro know what correct file needs to be reconciled?
Here we can use a simple If Statement code to generate a this-or-that scenario. Our code to determine which file will open is:
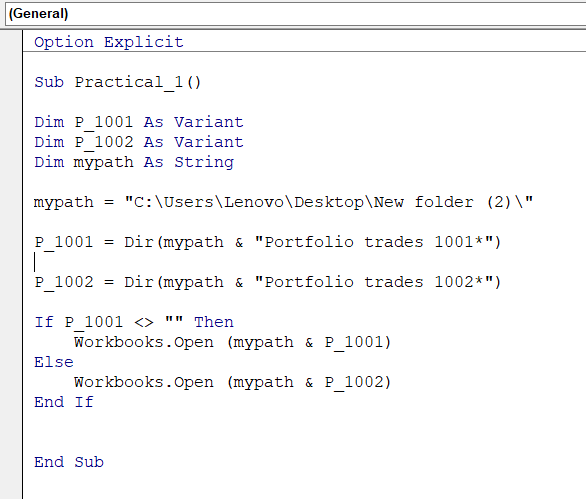
Let’s understand the code that we have written. The file names are ‘Portfolio trades 1001’ and ‘Portfolio trades 1002’, respectively, received via emails. Those files are saved in the New folder (2) in the Desktop.
We set two variables, P_1001 and P_1002, for our Excel files that need to be opened. Since we will receive this as email attachments (lots of alphanumeric characters!), we have set these two variables as variants. This means any characters after ‘Portfolio trades 1001 and VBA code can still identify and open the correct file.
Next, we have set our path where our files are located. Concatenating this path with the file name gives the value to our variables.
Here comes the critical part with the If statement that decides which file to open. We had briefly discussed logical comparison operators at the beginning of the article. Here we use the <> (not equal to) operator to check if the file exists or not.
To be fair, this operator is our personal favorite owing to its wide range of applications while writing the VBA code. So if the code finds our concatenated path + filename (P_1001) in the folder, it will open the file, else it will open the other file (P_1002).
VBA If Else Example 2
When you are working on big data, you will always come across files that contain messy datasets. For example, empty rows and columns can be quite a hassle when working on such files because it makes it difficult to reference these rows and columns in your formulas. Hence it becomes necessary to clean such datasets before you proceed to work on them.
Assume that you have the following table in your Excel spreadsheet:
To get rid of unnecessary rows and columns in the spreadsheet, we have written a VBA code as:
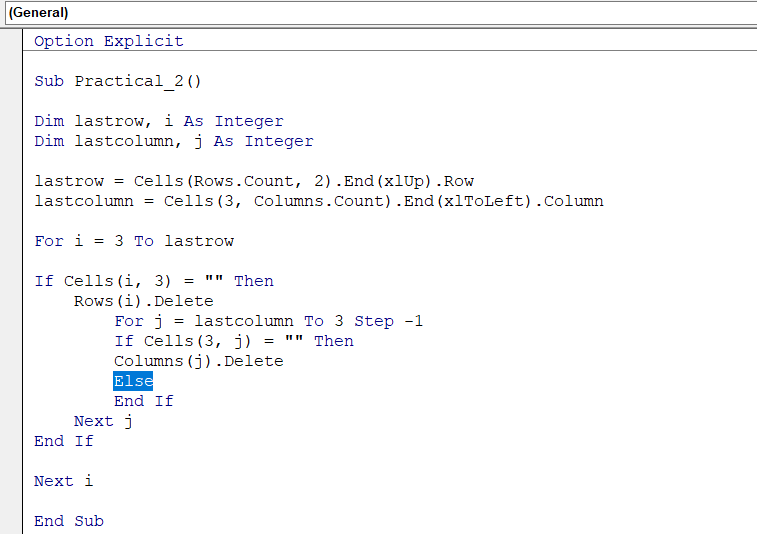
Now, our basic assumption in the code is based on the cell value in the third row and column. Therefore, the code will delete the rows and columns if the cell is empty, respectively.
Here we have incorporated the last column code similar to the last row that finds the last cell in the designated row, which in this case is the third row.
Our nested If Statements check whether the cell is empty and, if not, then moves onto the next value until it checks the data for the last row and column, respectively.
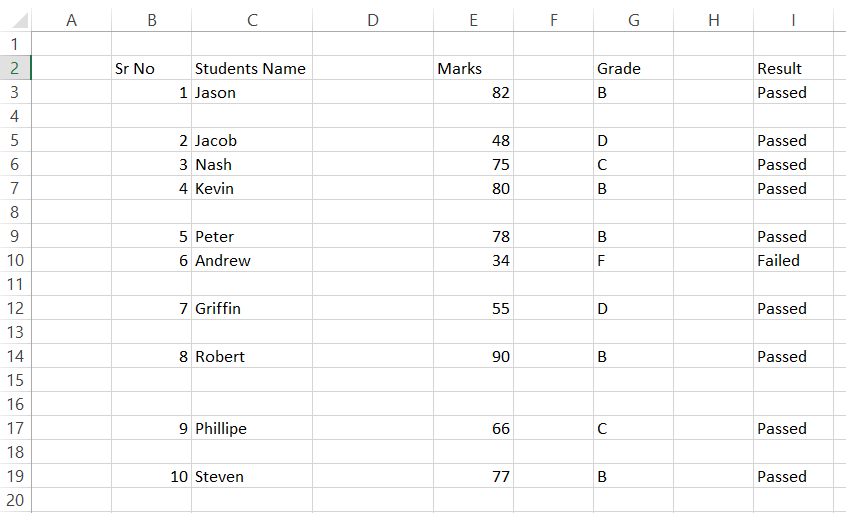
This is what your table will look like after you run the macro:
There might be instances where your looping row might not have any value while the rest of the table might have values. For example, in the below example, rows 5 and 14 are not empty entirely. Instead, we are just missing the values in columns B and C.
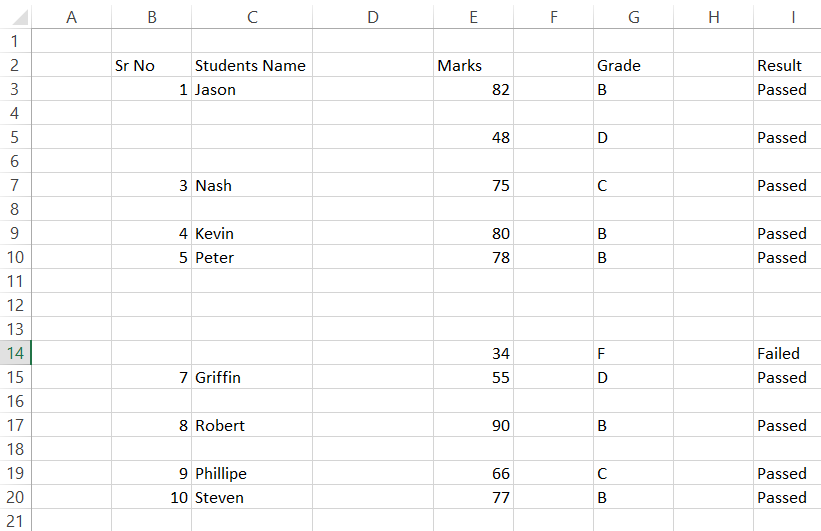
If we run the macro now, the code will delete those rows based on our assumption that only one cell value is not empty. In such a case, if we need to check all the values of each cell in the table, we need to assign more variables and use them in our if statements and for loops.
VBA If Else Example 3
Changing background colors to highlight data discrepancies is a great way to filter the unwanted values from our spreadsheets. You can change the background color of the cell by using two different codes:
- Range(“A1”).Interior.ColorIndex = 3 - When you use the ColorIndex code, it represents the color palette present in the Home tab of the Excel. Since the color palette has a total of 56 colors, the ColorIndex can have a total of 56 color combinations ranging from 1 to 56.
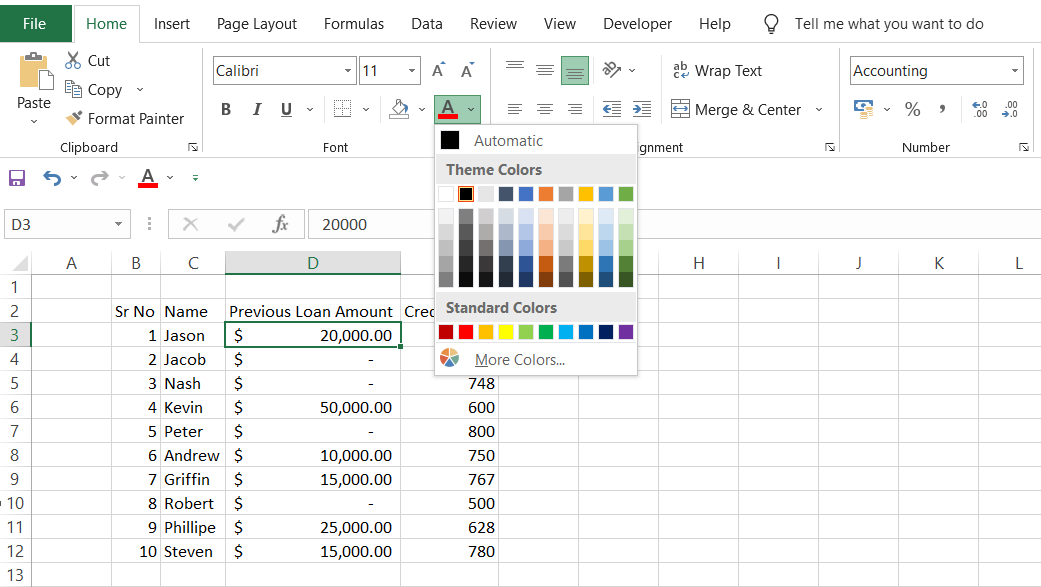
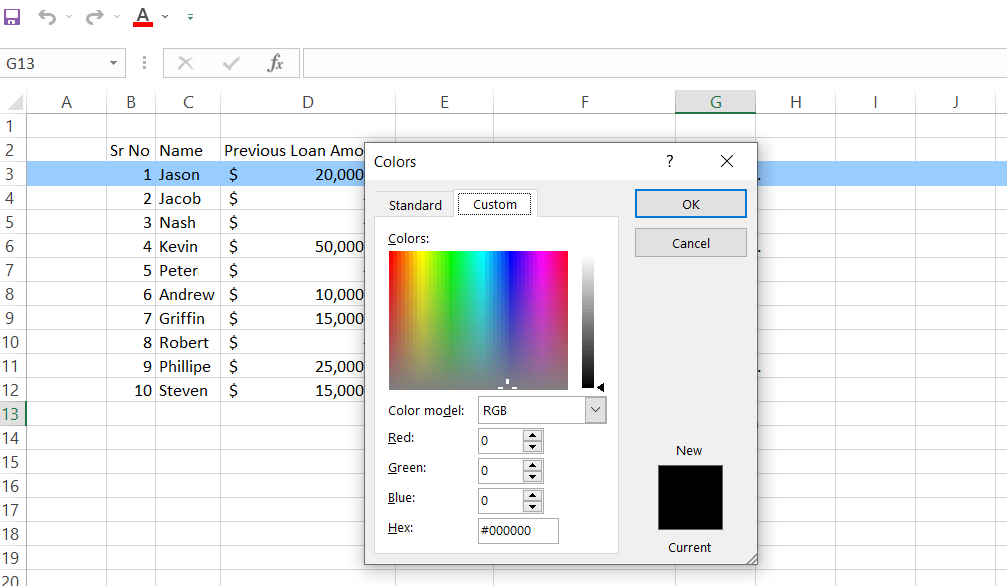
- Range(“A1”).Interior.Color = RGB (0,255,0) - RGB stands for Red, Green and Blue in the code. The value for each color of RGB can range from 0 to 255, meaning a total of 16, 777, 216 color combinations can be formed, giving more flexibility in using the required color. This is similar to when you click on the More Colors option below the color palette, which opens the dialog box for the color as below:
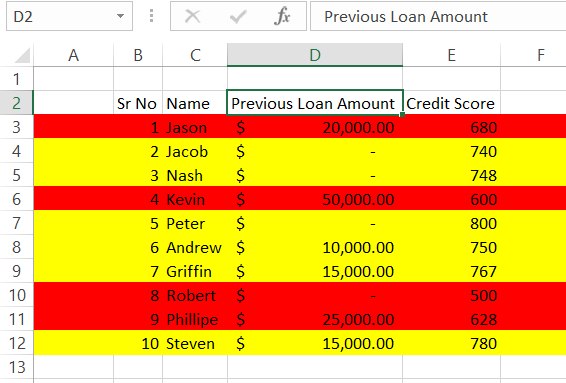
Let’s say that you need to determine which applicant can get a loan at your bank. From the Excel spreadsheet that contains the credit scores for the applicants, we have written the below code:
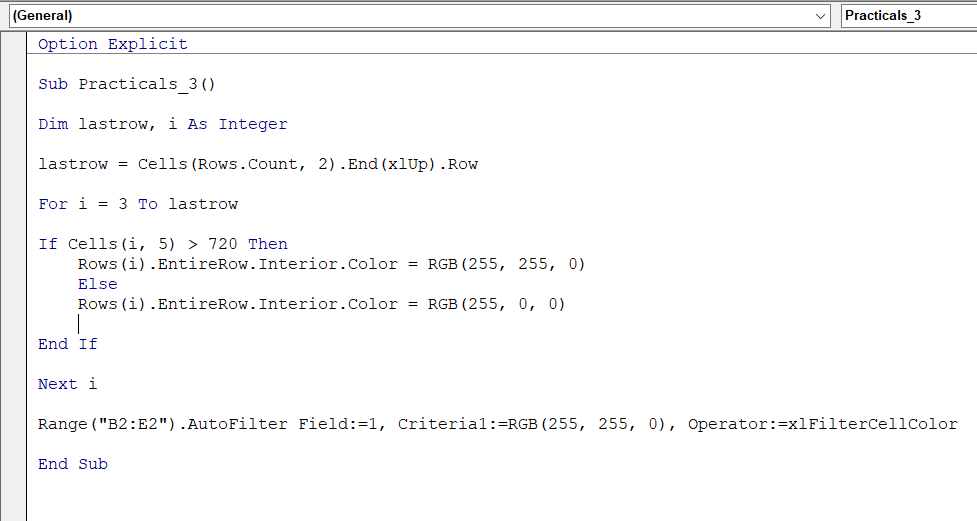
When you run this code, it will highlight the rows that have higher credit scores than 720 with yellow color or else with red color if the credit score is less than 720.
Here we see that a color combination of Red and Blue with value 255 each gives the yellow color in our VBA code. This code will loop through all the cells till it reaches the final row.
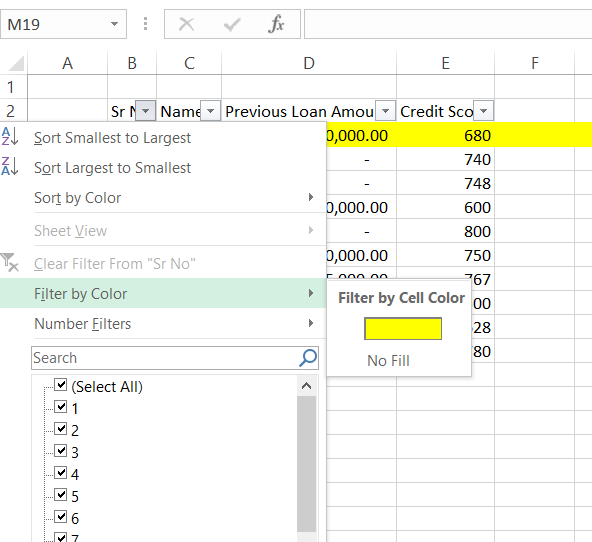
The final piece of code Range(“B2:E2”).AutoFilter is used to filter our data based on the color value. We have filtered via column 1, i.e., B in our data table in which our criteria was yellow color as represented by code RGB(255,255,0).
Our operator in code is XlFilterCellColor. This is similar to using Filter by Color while using the filter function present in the home tab.
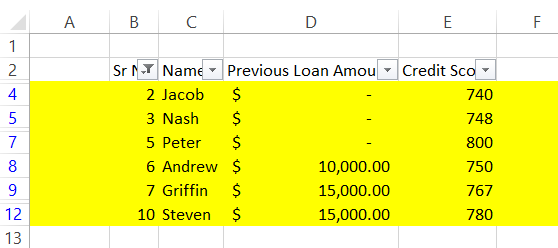
The spreadsheet will look as follows when the macro runs successfully.
If you want to analyze the data for applicants for whom loans were rejected, just remove the filter, and it will display the entire result as shown below:
More on Excel
To continue your journey towards becoming an Excel wizard, check out these additional helpful WSO resources.


or Want to Sign up with your social account?