VBA Quick Reference
A quick reference that summarizes essential VBA concepts, syntax, and functions. It is handy for programmers to access pivotal information for coding, troubleshooting, and optimizing Excel Macros.


VBA Quick Reference Guide
A VBA Quick Reference is a quick reference that summarizes important and essential VBA concepts, syntax, and functions. It is handy for programmers to access pivotal information for coding, troubleshooting, and optimizing Excel Macros.

We have already written loads of articles on how you can begin writing your very own VBA code. The first prerequisite is to enable the developer's tab and then head over to the VBA editor to create a macro.
You can either record the macro or directly write your very own code. For example, it will let you copy the stock prices for Apple Inc., get them in tabularized format, and eventually create a graph with a click of a button.
We usually prefer writing our code because it enables easy customization of code to make it dynamic.
However, you can record the code first and then make the necessary changes so that the macro can easily adjust to the data dimensions.
Well, all that's for a different article called Excel VBA Macros, which you can check out to learn how to begin writing macros.
We also have tons of other articles that will guide you through the different components of the Developer tab and the different tools you can use while writing a macro.
This article, however, will give you some of the snippets of code you can use while writing your macro. It would also be helpful if you were going to sign up for a VBA course.
- The VBA Quick Reference Guide provides a concise summary of essential syntax elements used in Visual Basic for Applications (VBA), including keywords, operators, and common constructs.
- It covers fundamental language elements such as variables, data types, control structures (like loops and conditionals), procedures (subroutines and functions), and error handling.
- It may offer best practices for writing efficient and maintainable VBA code, such as using meaningful variable names, organizing code into modular functions, and commenting code to improve readability.
- It includes a list of commonly used methods and properties for Excel objects, enabling quick access to functionalities like formatting cells, manipulating ranges, and performing calculations.
Selecting the worksheets, cells, rows & columns using VBA
This section will reference all the codes you use while beginning to write a macro. The Sub….EndSub is essential; however, everything between them will fall under this category.
A. Selecting a workbook
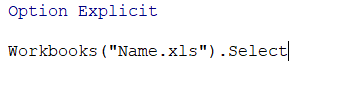
The select syntax helps to select a workbook, worksheet, or even a range of given alternatives.
B. Selecting a worksheet from the given workbook
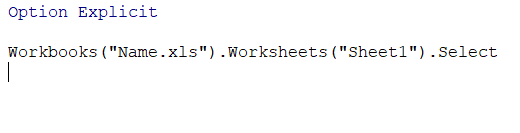
As mentioned earlier, this syntax will help select a particular worksheet.
C. Selecting the range on a specific worksheet

Once the workbook and worksheet are referenced, you can select a particular range, such as A2:A6, in sheet 1. This will let you perform varied tasks, such as copying the data or clearing the contents in the selected range.
D. Selecting a specific cell on a specific worksheet

Similar to selecting a range of cells, we can also select the cell using the above syntax.
E. Selecting the current active cell

If you require to select the active cell, ActiveCell.Select will work wonder
F. Selecting a specific row

If selecting a cell or range is possible, it's only natural that you can select an entire range. For example, the code above lets us select row 2 in spreadsheet 1.
G. Selecting a specific column

Like row syntax, we have the code for a column that will select column A.
H. Activating a workbook or worksheet
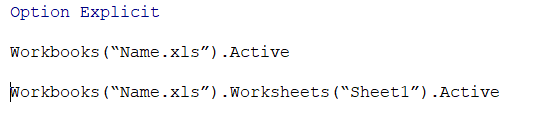
The snippet of code above will activate the workbook and worksheet, respectively.
Clearing Data, deleting rows, columns & entire spreadsheets
Once you have initiated writing the code by referencing the sheets, workbook, and range, the next logical step is to check whether the file contains existing data.

You would often work in the same macro file, so there is a high probability that it might contain existing data. However, it wouldn't be efficient if we had to check the spreadsheets every other time.
The best alternative is removing the data from selected ranges, rows, columns, or spreadsheets.
Thus, removing the existing data becomes essential to add newer data for the analysis.
A. Clearing the data in specific cells

The code above specifically clears the data in range A3:B45 in worksheet 1. Any other data remains unaffected.
B. Cleaning the data in the entire spreadsheet

Don't add cell references when you want to clear the data from the entire sheet. Instead, add the cells syntax and use ClearContents
C. Deleting a row
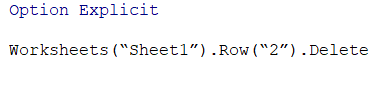
The code will delete the data from the second row of Worksheet 1.
D. Deleting a column
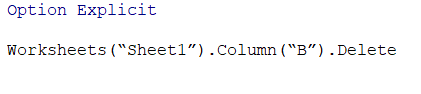
The code will delete the data from column B in Worksheet 1.
E. Adding a new spreadsheet
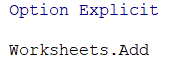
This syntax specifically lets you add an extra worksheet to the workbook. You can even define whether the worksheet should be added before or after a particular existing worksheet.
F. Deleting a spreadsheet
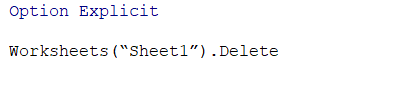
Finally, our syntax will let you delete an existing spreadsheet.
Note
It always helps if we are specific while writing the code. The simplest mistake anyone can make while writing a macro can be needing to be specific, which will eventually cause a lot of breakage in code.
For example, if three different spreadsheets exist and you still need to mention the sheet name, then Excel will follow the next set of instructions if we are clear on what worksheet must be selected to be worked upon.
Different VBA operators
The comparison and arithmetics are integral to the VBA world and general formulas.

These operators are necessary for you to do; it just opens a sea of possibilities with what you can do with numbers or even text strings.
First, let's see the arithmetic operators. For example, if we have two numbers, i.e., 12 and 6, then the interpretation between their comparison will be:
| Operators | Description | Result |
|---|---|---|
| + | Adds two values | 12 + 6 will give 18 |
| - | Subtracts one value from another | 12 - 6 will give 6 |
| / | Divides a numerator by denominator | 12 / 6 will give 2 |
| * | Multiplies two values | 12 * 6 will give the result as 72 |
| % | Returns a remainder after division | 12 % 6 will give the remainder as 0 |
| ^ | Exponentiates a number | 12^6 will give 29,85,984 |
Similarly, we also have the comparison operators as illustrated below:
| Operator | Description | Result |
|---|---|---|
| = | Checks if two numbers A & B are equal | (12 = 6) is FALSE |
| <> | Checks if two numbers A & B are not equal | (12 <> 6) is TRUE |
| > | Checks if number A is greater than number B | (12 > 6) is TRUE |
| < | Checks if number A is smaller than number B | (12 < 6) is FALSE |
| >= | Checks if number A is greater than or equal to number B | (12 >= 6 ) is TRUE |
| <= | Checks if number A is smaller than or equal to number B | (12 <= 6 ) is FALSE |
We also have the logical operators supported by VBA. They help to compare two different conditional statements and further increase the scope of comparison in the code.
| Operators | Description | Result |
|---|---|---|
| AND | If conditions A and B are TRUE, then the result is TRUE | (12 > 0 AND 6 > 0) is TRUE |
| OR | Either condition A or B must be TRUE for the result to be TRUE | (12 > 0 OR 6 = 0) is TRUE |
| NOT | If a condition is TRUE, it will return the result as FALSE. | NOT(12 =0) is TRUE |
| XOR | Returns TRUE only if one of the conditions is TRUE | (12 > 0 XOR 6 = 0) is TRUE |
Finally, we also have concatenation symbols or operators that either add two numbers or text strings.
| Operators | Description | Result |
|---|---|---|
| + | Add two numbers | 12 + 6 gives 18 |
| & | Add two text strings together | “Hi”&” “&”Josh” will give text string as “Hi Josh” |
Now that we know the different operators, let's move on to a different section.
Assigning Variables and finding the last value in rows & columns using VBA
Think of it this way. Your VBA code won't be limited to just a couple of variables, A & B. How do you add more variables and assign a data type to them?
This can be done with the help of 'Dim' syntax. Dim stands for declare, used to declare a variable and the following data type. Let's see what different data types are before we start assigning them.
Even the data types can be of two types - numeric and non-numeric. First, we will see numeric values:
| Data type | Range of Value |
|---|---|
| Byte | 0 to 255 |
| Integer | -32,768 to 32767 |
| Long | -2,147,483,648 to 2,147,483,648 |
| Single | -3.402823E+38 to -1.401298E-45 for negative values 1.401298E-45 to 3.402823E+38 for positive values. |
| Double | -1.79769313486232e+308 to -4.94065645841247E-324 for negative values 4.94065645841247E-324 to 1.79769313486232e+308 for positive values. |
What data type you use for numbers ultimately affects the processing speed of MS Excel. For example, if the data type is byte or integer, it will process the variable extremely fast. On the other hand, if the variable is single or double, the macro 'might' take some time to process.
But it also has the advantage of using a larger range of values for assigning numerical variables.
Similarly, we also have the non-numeric data types as below:
| Data Types | Range Of Value |
|---|---|
| String | 1 to 65,400 characters |
| Date | 01/01/1900 to 12/31/9999 |
| Boolean | TRUE or FALSE |
| Object | Any assigned object, for example, a worksheet |
| Variant | Can contain any type of data |
The examples of different data types assigned to the variable are:
A. Assigning a variable as a text string
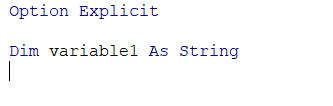
The syntax above will identify variable 1 as a text string. Thus, it will have all the properties of text strings.
B. Assigning variables as a number, long & text string
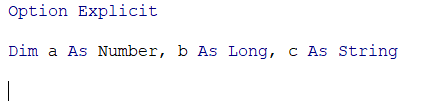
Assigning multiple variables to different data types in the same line is possible. For example, we have three variables assigned to three data types.
C. Assigning an array
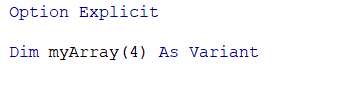
You can even assign an array using the Dim statement. The parentheses are used to store the number of items that are present in the array.
D. Assigning Excel objects
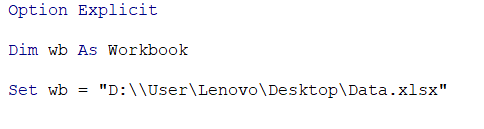
Finally, we can assign variables as entire Excel objects. The objects can be worksheets, spreadsheets, ranges, or even cells.
Thus, the next time you call the variable in the code, it will automatically correspond to the file and perform the next set of operations.
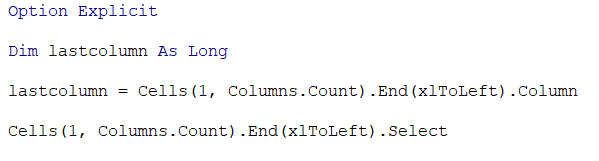
E. Finding the number of the last column containing data in the spreadsheet
There are two lines of code to find the last value in a column. First, you assign the variable:
Dim last column as long
Then you find the last column using the syntax:
lastcolumn = Cells(1, Columns.Count).End(XltoLeft).Column
If you just want to select the data in the last cell, you can use the syntax below:
Cells(1, Columns.Count).End(xlToLeft).Select
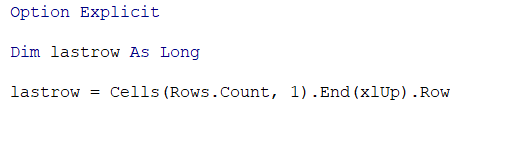
F. Finding the last row containing data in the spreadsheet
Similar to finding the number of the last column, we first assign a variable and then use the formula to find the last row.
NOTE
In both the syntax for finding the last rows and columns, the numerical value for the Cells syntax indicates the rows and columns where we find its last respective value. For example, lastrow = Cells(Rows.Count,1).End(xlUp).Row means we are looking for the last row in column 1.
Similarly, if we need to find the last row in column C, the formula becomes last row = Cells(Rows.Count, 3).End(xlUp).Row.
This is necessary because there might be inconsistencies in the data, such as having blank cells in various sections of the dataset, which can cause the last row or column to change accordingly.
Using Different Loops in VBA
If you want to write an awesome VBA code, loops will be integral to your macro.

There are two simple reasons why loops are important -
- You don't need to repeat the same line of code repeatedly.
- It gives you greater flexibility in writing a dynamic VBA code.
There are four types of loops that you can use in VBA, as illustrated below:
A. For Next Loop
The For..Next loop executes a condition 'n' a number of times.
First, you begin by assigning a variable as below:
Dim m as long
Then you use the loop for executing a condition 'n' a number of times as:
For m = 1 to 1000 [Step counter]
[Statement]
Next m
This will take the loop from assuming the value as 1 to 1000 and repeat the statement each time. You can even integrate the last row or column function along with the loop as:
For m = 1 to lastrow [Step counter]
[Statement]
Next m
This code will only loop from the beginning of the data until the last row.
B. Do While Loop
The Do While loop iterates while a condition is TRUE.
The syntax will be:
Do while [condition]
[statement]
Loop
If the condition is TRUE, the loop continues, whereas if it evaluates to FALSE, the code exits the loop.
C. Do Until Loop
The Do Until loop iterates 'until' the condition becomes TRUE. If the condition evaluates to FALSE, the loop keeps repeating until the condition is satisfied.
The syntax will be:
Do Until [condition]
[statement]
Loop
D. For Each Loop
The For Each loop executes specific statements for each item in a given collection. For example, if there are four items in the collection, the statement would apply to each.
The syntax for For Each loop is:
For Each item in the collection
[statement]
Next item
Two syntaxes can be used to exit the above loops.
Exit For - Immediately exits the for loop
Exit Do - Immediately exits the do loop
VBA Quick Reference for Opening and Closing a file from a specific location
To open or close a file, especially an Excel file, first, you need to assign it as an object. We begin with the code.

Dim mypath as string
Then we assign the path to the variable as below:
mypath = "C:\Users\Lenovo\Desktop\New folder\"
Let's say the file is assigned the variable as file1. Then the syntax will be
Dim file1 As Variant
file1 = Dir(mypath & "file1*")
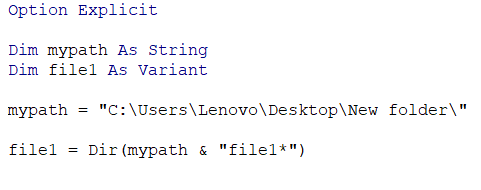
The above statement gives the complete path of the file, i.e., path + file name. We add the '*' in case the file name changes every time. For example, file123, file124, file125 etc. We see that file 1 remains constant while the only value that changes is the last two numbers.
Thus, the code will still automatically identify the file and open it.
In the case of opening files, a variant works the best. However, always try sticking to variants, as you might need more satisfactory results with other data types.
Finally, we input a conditional statement to check whether the file exists in the path & then open it accordingly or display a message box saying, "The file does not exist."
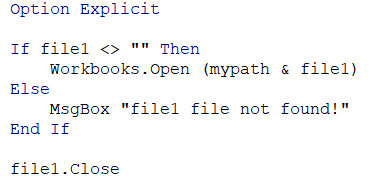
Once the file is opened and a particular task is completed, all you need to do is use the below syntax:
file1.Close
If you wish to speed up your macro running time, add the codes below at the beginning of the macro after assigning variables.
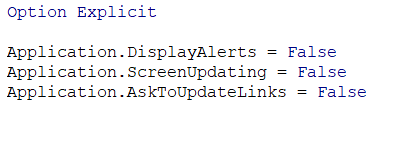
Also, ensure that once the code is completely written, you set this back to True before the End Sub statement.

If you know these syntaxes, writing a VBA code would be easy.
Just trust us!

Free Resources
To continue learning and advancing your career, check out these additional helpful WSO resources:


or Want to Sign up with your social account?